
Introduction of array function
In Python, arrays are used to store collections of data in an organized manner. They can hold multiple items of the same data type, and their elements can be accessed using indices. While Python does not have a built-in array data type like some other programming languages, it offers similar functionality through lists and other specialized libraries like array and numpy.
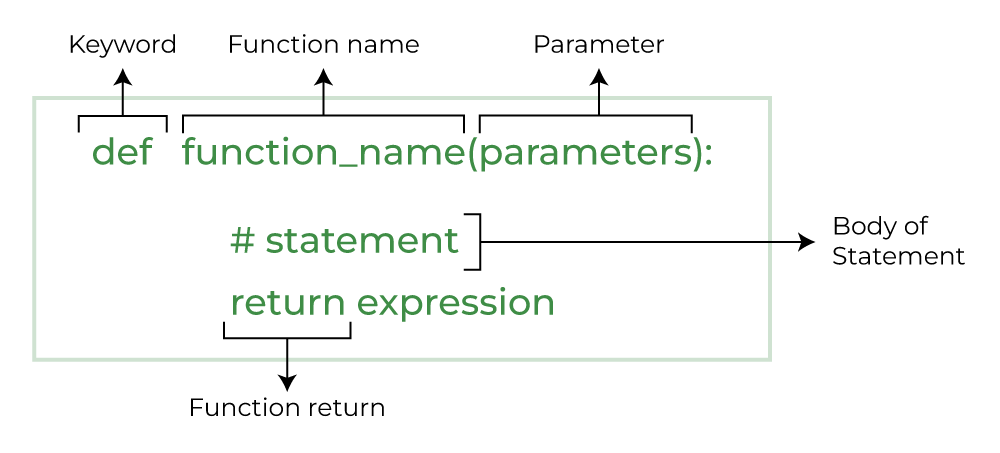
Python Functions:
Python Functions is a block of statements that return the specific task. The idea is to put some commonly or repeatedly done tasks together and make a function so that instead of writing the same code again and again for different inputs, we can do the function calls to reuse code contained in it over and over again.
Some Benefits of Using Functions
- Increase Code Readability
- Increase Code Reusability
Five types of Arguments in python :
- Default argument
- Keyword arguments (named arguments)
- Positional arguments
- Arbitrary positional arguments
- Arbitrary keyword arguments
1. Default Arguments:
Default arguments allow you to define default values for parameters in a function. If the caller of the function does not provide a value for a parameter with a default value, the function uses the default value.
syntax:
def function_name(param1, param2=default_value):
# Function body
Example:
def greet(name, greeting=”Hello”):
print(f”{greeting}, {name}!”)
Using default argument
greet(“prakash”) # Output: Hello, prakash
Overriding default argument
greet(“bhanu”, “Hi”) # Output: Hi,bhanu
In this example, greeting is a default argument with a default value of "Hello". If no second argument is passed, the function uses the default value.
2. Keyword Arguments:
Keyword arguments allow you to specify arguments by name, making the code more readable and the order of arguments irrelevant.
Syntax:
def function_name(param1, param2):
# Function body
Calling with keyword arguments
function_name(param1=value1, param2=value2)
Example:
def describe_pet(pet_name, animal_type):
print(f”I have a {animal_type} named {pet_name}.”)
Using keyword arguments
describe_pet(animal_type=”dog”, pet_name=”Buddy”)
Output: I have a dog named Buddy.
In this example, the function describe_pet is called with keyword arguments, allowing the order of arguments to be switched.
3. Positional Arguments:
Positional arguments are the most common type of argument. They must be passed in the correct order, and the number of arguments passed must match the number of parameters defined in the function.
Syntax:
def function_name(param1, param2):
# Function body
# Calling with positional arguments
function_name(value1, value2)
Example:
def add(a, b):
return a + b
#Using positional arguments
result = add(5, 3)
print(result) # Output: 8
In this example, the function add takes two positional arguments a and b, which are provided in the correct order when calling the function.
4. Variable-length Arguments (Args and Kwargs)
Python allows you to define functions that can accept a variable number of arguments.
There are two types of variable-length arguments: *args for non-keyword arguments and **kwargs for keyword arguments.
*args (Non-keyword Arguments)
The *args syntax allows you to pass a variable number of non-keyword arguments to a function. The function receives these arguments as a tuple.
syntax:
def function_name(*args):
# Function body
Example:
def calculate_sum(*numbers):
total = sum(numbers)
print(f”Sum: {total}”)
#Using variable-length non-keyword arguments
calculate_sum(1, 2, 3, 4, 5) # Output: Sum: 15
In this example, *numbers allows the function to accept any number of arguments, and they are accessible as a tuple within the function.
**kwargs (Keyword Arguments):
The **kwargs syntax allows you to pass a variable number of keyword arguments to a function. The function receives these arguments as a dictionary.
syntax:
def function_name(**kwargs):
# Function body
Example:
def display_info(**info):
for key, value in info.items():
print(f”{key}: {value}”)
Using variable-length keyword arguments
display_info(name=”Alice”, age=30, city=”New York”)
Output:
name: Alice
age: 30
city: New York
In this example, **info allows the function to accept any number of keyword arguments, which are stored in a dictionary.
5. Required Arguments:
Required arguments are the arguments that must be passed to a function in the correct order and with the correct number. If any required argument is missing, Python raises a TypeError.
syntax:
def function_name(param1, param2):
# Function body
#Calling with required arguments
function_name(value1, value2)
Example:
def multiply(a, b):
return a * b
#Using required arguments
result = multiply(4, 5)
print(result) # Output: 20
In this example, the function multiply requires two arguments a and b. If you try to call the function without providing both arguments, Python will raise an error.
Summary
- Default Arguments: Provide default values for parameters that can be overridden if needed.
- Keyword Arguments: Allow passing arguments by name, making the code more readable and order-independent.
- Positional Arguments: Require arguments to be passed in the correct order.
- Variable-length Arguments (
*argsand**kwargs): Allow passing a variable number of non-keyword or keyword arguments. - Required Arguments: Must be passed in the correct order and number, or a
TypeErrorwill be raised.
Anonymous Functions in python
Anonymous functions in Python are known as lambda functions. These are small, unnamed functions defined using the lambda keyword. Unlike regular functions defined with def, lambda functions are limited to a single expression and are often used for short-term operations that are not reusable or require a simple function on-the-fly.
Characteristics of Lambda Functions:
- Anonymous: Lambda functions do not have a name, which is why they are called anonymous.
- Single Expression: They are limited to a single expression and cannot contain multiple expressions or statements.
- Return Value: They return the result of the single expression implicitly, so there is no need to use a
returnstatement. - Function Objects: Like regular functions, lambda functions return function objects and can be assigned to variables and called.
Syntax:
lambda arguments: expression
here’arguments: A comma-separated list of arguments.expression: A single expression that is evaluated and returned.
example:
add = lambda x, y: x + y
#Using the lambda functionresult = add(3, 5)
print(result) # Output: 8
| With lambda function | Without lambda function |
|---|---|
| Supports single-line sometimes statements that return some value. | Supports any number of lines inside a function block |
| Good for performing short operations/data manipulations. | Good for any cases that require multiple lines of code. |
| Using the lambda function can sometime reduce the readability of code. | We can use comments and function descriptions for easy readability. |
Return statement in python:
A return statement is used to end the execution of the function call and “returns” the result (value of the expression following the return keyword) to the caller. The statements after the return statements are not executed. If the return statement is without any expression, then the special value None is returned. A return statement is overall used to invoke a function so that the passed statements can be executed.
Note: Return statement can not be used outside the function.
syntax:
def fun():
statements
.
.
return [expression]
Example 1: Returning a Single Value
def add(a, b):
result = a + b
return result
#Using the function and capturing the return value
sum_value = add(5, 3)
print(sum_value) # Output: 8
In this example, the add function takes two arguments, calculates their sum, and returns the result using the return statement. The returned value is stored in the variable sum_value.
Example 2: Returning Multiple Values
def divide_and_remainder(dividend, divisor):
quotient = dividend // divisor
remainder = dividend % divisor
return quotient, remainder
#Using the function and unpacking the return values
quot, rem = divide_and_remainder(10, 3)
print(f”Quotient: {quot}, Remainder: {rem}”) # Output: Quotient: 3, Remainder: 1
In this example, the divide_and_remainder function returns two values: the quotient and the remainder. These values are returned as a tuple, which is then unpacked into the variables quot and rem.
Global and Local Variables in Python
Python Global variables are those which are not defined inside any function and have a global scope whereas Python local variables are those which are defined inside a function and their scope is limited to that function only. In other words, we can say that local variables are accessible only inside the function in which it was initialized whereas the global variables are accessible throughout the program and inside every function.
Python Local Variables
Local variables in Python are those which are initialized inside a function and belong only to that particular function. It cannot be accessed anywhere outside the function. Let’s see how to create a local variable.
Python Global Variables
These are those which are defined outside any function and which are accessible throughout the program, i.e., inside and outside of every function. Let’s see how to create a Python global variable
Why do we use Local and Global variables in Python?
Now, what if there is a Python variable with the same name initialized inside a function as well as globally? Now the question arises, will the local variable will have some effect on the global variable or vice versa, and what will happen if we change the value of a variable inside of the function f()? Will it affect the globals as well? We test it in the following piece of code:
Module in python
a module is essentially a file containing Python code that can define functions, classes, and variables, and can also include runnable code. Modules allow you to logically organize your Python code and reuse it across different programs. By dividing your code into modules, you make it easier to manage, maintain, and understand. Modular programming refers to the process of breaking a large ,unwieldy programming
task into separate,smaller ,more manageable subtask or modules .individual modules can then be clubbed together like building blocks to create a larger appplication.
Advantages of modules:
1. Code Reusability
- Modular Design: By organizing code into modules, you can reuse functions, classes, and variables across multiple programs. This avoids the need to duplicate code, making it easier to maintain and update.
- Sharing: You can share modules with other developers, allowing them to use your code in their projects.
2. Improved Code Organization
- Separation of Concerns: Modules help in separating different functionalities into distinct files, making it easier to navigate and manage large codebases.
- Logical Grouping: Related functions and classes can be grouped together, enhancing the readability and logical structure of the code.
3. Namespace Management
- Avoid Name Conflicts: Modules create separate namespaces, which help prevent name conflicts between different parts of a program. This is especially useful when integrating third-party libraries or when multiple modules have functions or variables with the same name.
4. Ease of Maintenance
- Isolated Changes: When code is organized into modules, changes can be made to a specific module without affecting other parts of the program. This makes it easier to update and maintain the code.
- Simplified Debugging: By isolating code into smaller, manageable pieces, debugging becomes more straightforward. Issues can be traced back to specific modules, which can be tested and fixed independently.
5. Scalability
- Managing Large Codebases: As a project grows, managing a large codebase becomes more feasible with modules. You can break down complex systems into simpler, modular components.
- Parallel Development: Teams can work on different modules simultaneously, which can improve development speed and efficiency.
6. Encapsulation
- Encapsulation of Implementation Details: Modules allow you to encapsulate implementation details, exposing only what is necessary through the module’s interface. This helps in hiding the internal workings and reduces the risk of unintended interactions with other parts of the program.
7. Facilitates Testing
- Unit Testing: Modules can be tested independently, making unit testing more manageable. Each module can have its own set of tests to ensure it functions correctly.
- Test Isolation: By testing modules in isolation, you can more easily identify where issues arise without interference from other parts of the code.
8. Use of Built-in and Third-party Modules
- Built-in Libraries: Python’s standard library includes a wide array of built-in modules for common tasks, reducing the need to write code from scratch.
- Third-party Libraries: Python’s ecosystem includes many third-party libraries that provide pre-built modules for specific tasks, saving development time and effort.
Create a Python Module
To create a Python module, write the desired code and save that in a file with .py extension. Let’s understand it better with an example:
Example
Let’s create a simple calc.py in which we define two functions, one add and another subtract.# A simple module, calc.pydefadd(x, y):return(x+y)defsubtract(x, y):return(x-y)
Import module in Python
We can import the functions, and classes defined in a module to another module using the import statement in some other Python source file.
When the interpreter encounters an import statement, it imports the module if the module is present in the search path.
Note: A search path is a list of directories that the interpreter searches for importing a module
For example, to import the module calc.py, we need to put the following command at the top of the script.
Syntax to Import Module in Python:
import module
Importing modules in Python Example
Now, we are importing the calc that we created earlier to perform add operation.# importing module calc.pyimport calcprint(calc.add(10, 2))
Summary
- Modules: Python files with a
.pyextension containing definitions and implementations of functions, classes, and variables. - Importing Modules: Use the
importstatement to include modules in your program. - Packages: Directories containing multiple related modules, along with an
__init__.pyfile to indicate the directory is a package.
python packages:
In Python, a package is a way of organizing related modules into a directory hierarchy. Packages are used to structure large codebases and to distribute reusable code to others. They provide a convenient way to organize and manage complex systems by grouping related functionality together.
Key Features of Python Packages:
Namespace: Packages help in managing namespaces and avoid name conflicts, as modules inside packages can have the same name as modules in other packages.
Directory Structure: A package is essentially a directory that contains a special file named __init__.py. This file can be empty or can include package initialization code. The presence of __init__.py indicates that the directory should be treated as a package.
Sub-packages: Packages can contain sub-packages, which are simply subdirectories that also contain an __init__.py file. This allows for a nested, hierarchical structure of modules and packages.
How to Create Package in Python?
Creating packages in Python allows you to organize your code into reusable and manageable modules. Here’s a brief overview of how to create packages:
- Create a Directory: Start by creating a directory (folder) for your package. This directory will serve as the root of your package structure.
- Add Modules: Within the package directory, you can add Python files (modules) containing your code. Each module should represent a distinct functionality or component of your package.
- Init File: Include an __init__.py file in the package directory. This file can be empty or can contain an initialization code for your package. It signals to Python that the directory should be treated as a package.
- Subpackages: You can create sub-packages within your package by adding additional directories containing modules, along with their own __init__.py files.
- Importing: To use modules from your package, import them into your Python scripts using dot notation. For example, if you have a module named module1.py inside a package named mypackage, you would import its function like this: from mypackage.module1 import greet.
- Distribution: If you want to distribute your package for others to use, you can create a setup.py file using Python’s setuptools library. This file defines metadata about your package and specifies how it should be installed.
Code Example
Here’s a basic code sample demonstrating how to create a simple Python package:
- Create a directory named mypackage.
- Inside mypackage, create two Python files: module1.py and module2.py.
- Create an __init__.py file inside mypackage (it can be empty).
- Add some code to the modules.
- Finally, demonstrate how to import and use the modules from the package.
mypackage/
│
├── __init__.py
├── module1.py
└── module2.py
Example Codemodule1.py
#save this file by using this name module1.py
def greet(name):
return f”Hello, {name}!”
class Person:
def init(self, name, age):
self.name = name
self.age = age
def introduce(self):
return f”My name is {self.name} and I am {self.age} years old.”
module2.py
#save this file by using this name module2.py
def add(a, b):
return a + b
def multiply(a, b):
return a * b
PI = 3.14159
Note:
And create one new file in mypackage and named as init.py
Using a Python Package
To use the mypackage in a Python script, you can import modules from the package using the import statement.
The code in main.py imports modules from a package named mypackage and uses functions and classes defined in these modules. Here’s a step-by-step explanation of what each part of the code does:
Example Usagemain.py
main.py
#Import the entire module
import mypackage.module1
import mypackage.module2
#Use functions and classes from module1
greeting = mypackage.module1.greet(“bhanu”)
print(greeting) # Output: Hello,bhanu
person = mypackage.module1.Person(“prakash”, 19)
print(person.introduce()) # Output: My name is prakash and I am 19 years ol
#Use functions from module2
result_add = mypackage.module2.add(5, 3)
print(“5 + 3 =”, result_add) # Output: 5 + 3 = 8
result_multiply = mypackage.module2.multiply(4, 6)
print(“4 * 6 =”, result_multiply) # Output: 4 * 6 = 24
print(“Value of PI:”, mypackage.module2.PI) # Output: Value of PI: 3.14159
Code Explanation
pythonCopy code# main.py

# Import the entire module
import mypackage.module1
import mypackage.module2
- Import Statements: The first part of the code imports two modules,
module1andmodule2, from a package namedmypackage. - Full Module Import: This method imports the entire module, allowing you to access its functions, classes, and variables with the
module_name.function_namesyntax.
Using Functions and Classes from module1
pythonCopy code# Use functions and classes from module1
greeting = mypackage.module1.greet("bhanu")
print(greeting)  # Output: Hello, bhanu!
greetFunction: This function, defined inmodule1, takes a name as an argument and returns a greeting string. It is used here to greet “Alice.”- Calling the Function: The function is called using the syntax
mypackage.module1.greet("bhanu"), wheremypackage.module1specifies the path to the function within the package.
pythonCopy codeperson = mypackage.module1.Person("prakash",19)
print(person.introduce())  # Output: My name is prakash and I am 19years old.
PersonClass: This class, also defined inmodule1, has an initializer (__init__) method that acceptsnameandageas arguments. It also has a method namedintroducethat returns a formatted string with the person’s name and age.- Creating an Instance: An instance of the
Personclass is created with the name “Bob” and age 30. - Using a Method: The
introducemethod is called on thepersoninstance, and the result is printed.
Using Functions from module2
pythonCopy code# Use functions from module2
result_add = mypackage.module2.add(5, 3)
print("5 + 3 =", result_add)  # Output: 5 + 3 = 8
addFunction: This function, defined inmodule2, takes two numbers as arguments and returns their sum.- Calling the Function: It is used here to add 5 and 3, and the result is printed.
pythonCopy coderesult_multiply = mypackage.module2.multiply(4, 6)
print("4 * 6 =", result_multiply)  # Output: 4 * 6 = 24
multiplyFunction: Another function inmodule2that takes two numbers and returns their product.- Calling the Function: It is used here to multiply 4 and 6, and the result is printed.
pythonCopy codeprint("Value of PI:", mypackage.module2.PI) # Output: Value of PI: 3.14159
PIVariable: This is a constant defined inmodule2, representing the mathematical constant pi.- Accessing the Variable: The value of
PIis accessed usingmypackage.module2.PIand printed.
Understanding the Package Structure
To understand how main.py interacts with mypackage, let’s revisit the package structure:
markdownCopy codemypackage/
    __init__.py
    module1.py
    module2.py
module1.py Code
pythonCopy code# module1.py

def greet(name):
    return f"Hello, {name}!"

class Person:
    def __init__(self, name, age):
        self.name = name
        self.age = age

    def introduce(self):
        return f"My name is {self.name} and I am {self.age} years old."
greetFunction: Returns a greeting string with the provided name.PersonClass: Represents a person with a name and age, including a method to introduce themselves.
module2.py Code
pythonCopy code# module2.py

def add(a, b):
    return a + b

def multiply(a, b):
    return a * b

PI = 3.14159
addFunction: Returns the sum of two numbers.multiplyFunction: Returns the product of two numbers.PIConstant: Represents the mathematical constant pi.
Execution Flow
- Imports:
main.pyimports bothmodule1andmodule2frommypackage. - Function Calls: It then calls the functions
greet,add, andmultiplyand accesses thePIvariable, printing the results. - Class Instantiation: An instance of
Personis created, and its methodintroduceis called to demonstrate how classes and methods are accessed.
Benefits of This Structure
- Modularity: Code is separated into modules, allowing for better organization and reuse.
- Namespace Management: Modules and packages provide separate namespaces to avoid name conflicts.
- Reusability: Functions and classes can be reused in other scripts by importing the necessary modules.
- Scalability: This approach supports scalable code organization, enabling projects to grow without becoming unmanageable.
Summary
The example in main.py demonstrates how to import and use functions, classes, and variables from modules within a package. This method supports modular programming practices, allowing for code that is organized, reusable, and maintainable.
String Slicing in python
String slicing in Python is a technique used to access a portion or a subset of a string. It allows you to extract substrings by specifying a range of indices. Python provides a very intuitive and flexible way to slice strings, which is one of its most powerful features.
String Slicing
The syntax for slicing a string is:
pythonCopy codestring[start:stop:step]
start: The starting index of the slice. The slice includes this index. If omitted, the default is0.stop: The stopping index of the slice. The slice excludes this index. If omitted, the default is the end of the string.step: The step size or interval between indices in the slice. If omitted, the default is1.
Examples of String Slicing

Examples of String Slicing
- Extracting a Substring
pythonCopy code
s= “Hello, World!”substring = s[0:5]print(substring)# Output: Hello- This slice starts at index
0and goes up to but does not include index5.
- This slice starts at index
- Using Default Start or Stop
s= “Hello, World!”
substring = s[:5]
print(substring) # Output: Hellos= “Hello, World!”- The same slice as above, but with
startomitted. Python assumes the defaultstartindex0.
substring = s[7:] print(substring) # Output: World!- This slice starts at index
7and continues to the end of the string.
- The same slice as above, but with
- Complete Slice with Step
s= “Hello, World!”substring = s[::2]print(substring)# Output: Hlo ol!- This slice uses the entire string with a
stepof2, effectively skipping every other character.
- This slice uses the entire string with a
Negative Indices
Negative indices in Python allow you to count from the end of the string, where -1 is the last character, -2 is the second to last, and so on.
- Slice from End of String
s= “Hello, World!”substring = s[-6:-1]print(substring)# Output: World- This slice starts at index
-6and ends at index-1(excluding-1).
- This slice starts at index
- Reversing a String
s= “Hello, World!”reversed_string = s[::-1]print(reversed_string)# Output: !dlroW ,olleH- This slice uses a
stepof-1to reverse the string.
- This slice uses a
Omitting Start and Stop
- Full String
s= “Hello, World!”full_string = s[:]print(full_string)# Output: Hello, World!- This slice includes the entire string from start to end.
- Slice with Only Step
s= “Hello, World!”every_third = s[::3]print(every_third)# Output: Hl r!- This slice starts from the beginning and selects every third character.
String immuntabiliy
String immutability in Python means that once a string object is created, it cannot be modified. Any operation that appears to modify a string actually creates a new string object. Let’s explore this concept in detail, including why strings are immutable, the implications of this property, and how to work with strings effectively.
Strings functions and methods
Basic String Methods
str.capitalize()- Example:
"bhanu".capitalize()→"Bhanu"
- Example:
str.upper()- Example:
"bhanu".upper()→"BHANU"
- Example:
str.lower()- Example:
"BHANU".lower()→"bhanu"
- Example:
str.title()- Example:
"bhanu prakash".title()→"Bhanu Prakash"
- Example:
str.swapcase()- Example:
"Bhanu".swapcase()→"bHANU"
- Example:
str.strip([chars])- Example:
" bhanu ".strip()→"bhanu"
- Example:
str.lstrip([chars])- Example:
" bhanu ".lstrip()→"bhanu "
- Example:
str.rstrip([chars])- Example:
" bhanu ".rstrip()→" bhanu"
- Example:
str.split([sep[, maxsplit]])- Example:
"bhanu prakash".split()→['bhanu', 'prakash']
- Example:
str.rsplit([sep[, maxsplit]])- Example:
"bhanu prakash".rsplit(maxsplit=1)→['bhanu', 'prakash']
- Example:
Click here for more String methods
str.splitlines([keepends])
- Example:
"bhanu\nprakash".splitlines()→['bhanu', 'prakash']
str.join(iterable)
- Example:
"-".join(["bhanu", "prakash"])→"bhanu-prakash"
str.find(sub[, start[, end]])
- Example:
"bhanu prakash".find("prakash")→6
str.rfind(sub[, start[, end]])
- Example:
"bhanu prakash prakash".rfind("prakash")→12
str.index(sub[, start[, end]])
- Example:
"bhanu prakash".index("prakash")→6
str.rindex(sub[, start[, end]])
- Example:
"bhanu prakash prakash".rindex("prakash")→12
str.count(sub[, start[, end]])
- Example:
"bhanu prakash prakash".count("prakash")→2
str.replace(old, new[, count])
- Example:
"bhanu prakash".replace("bhanu", "john")→"john prakash"
str.startswith(prefix[, start[, end]])
- Example:
"bhanu prakash".startswith("bhanu")→True
str.endswith(suffix[, start[, end]])
- Example:
"bhanu prakash".endswith("prakash")→True
str.zfill(width)
- Example:
"42".zfill(5)→"00042"
str.isalpha()
- Example:
"bhanu".isalpha()→True
str.isdigit()
- Example:
"123".isdigit()→True
str.islower()
- Example:
"bhanu".islower()→True
str.isupper()
- Example:
"BHANU".isupper()→True
str.isspace()
- Example:
" ".isspace()→True
str.istitle()
- Example:
"Bhanu Prakash".istitle()→True
str.isnumeric()
- Example:
"123".isnumeric()→True
str.rjust(width[, fillchar])
- Example:
"42".rjust(5, "0")→"00042"
str.ljust(width[, fillchar])
Example: "42".ljust(5, "0") → "42000"
Built-in Functions
len(s)- Example:
len("bhanu")→5
- Example:
str(object)- Example:
str(123)→"123"
- Example:
format(value, format_spec)- Example:
format(123.456, ".2f")→"123.46"
- Example:
repr(object)- Example:
repr("bhanu")→"bhanu"
- Example:
ord(char)- Example:
ord("B")→66
- Example:
chr(i)- Example:
chr(66)→"B"
- Example:
ascii(object)- Example:
ascii("bhanu")→"bhanu"
- Example:
Click here for Examples programs on strings
Capitalization and Case Conversion
pythonCopy codetext = "bhanu"
print(text.capitalize())  # Output: "Bhanu"
print(text.upper())       # Output: "BHANU"
print(text.lower())       # Output: "bhanu"
String Formatting
pythonCopy codename = "Bhanu"
age = 30
print(f"My name is {name} and I am {age} years old.")  # Output: "My name is Bhanu and I am 30 years old."
Splitting and Joining
pythonCopy codedata = "bhanu prakash"
items = data.split()
print(items)  # Output: ['bhanu', 'prakash']

joined = "-".join(items)
print(joined)  # Output: "bhanu-prakash"
Finding and Replacing
pythonCopy codetext = "bhanu prakash"
position = text.find("prakash")
print(position)  # Output: 6
new_text = text.replace("bhanu", "john")
print(new_text)  # Output: "john prakash"
String Checking
pythonCopy codeprint("bhanu".isalpha()) # Output: True
print("123".isdigit()) # Output: True
print(" ".isspace()) # Output: True
Arrays in Python
An array is a collection of items stored at contiguous memory locations. The idea is to store multiple items of the same type together. This makes it easier to calculate the position of each element by simply adding an offset to a base value, i.e., the memory location of the first element of the array (generally denoted by the name of the array).
While Python does not have a built-in array type like some other programming languages, it offers several ways to work with array-like data structures. Here’s
syntax:
b = [element1, element2, element3, …]
1. Lists
Lists are the most commonly used array-like data structure in Python. They are versatile and can store elements of different types, including numbers, strings, and even other lists.
Features:
- Dynamic Size: Lists can grow and shrink in size as needed.
- Mixed Data Types: They can hold elements of different data types.
- Flexible Operations: Lists support various operations like slicing, indexing, and iteration.
Example:
my_list = [1, 2, 3, 4, 5]
print(my_list)          # Output: [1, 2, 3, 4, 5]
print(my_list[0])       # Output: 1
print(my_list[1:4])     # Output: [2, 3, 4]
my_list.append(6)       # Adds 6 to the end of the list
print(my_list)          # Output: [1, 2, 3, 4, 5, 6]
2. Arrays from the array Module
Python’s array module provides an array type that is more memory-efficient for numerical data compared to lists. The array type requires specifying the type of elements it will hold.
Features:
- Type Restriction: Arrays hold elements of a single type.
- Efficient Storage: More memory-efficient than lists for large collections of numerical data.
Example:
import array
# Create an array of integers
my_array = array.array('i', [1, 2, 3, 4, 5])
print(my_array)        # Output: array('i', [1, 2, 3, 4, 5])
print(my_array[0])     # Output: 1
my_array.append(6)     # Adds 6 to the end of the array
print(my_array)        # Output: array('i', [1, 2, 3, 4, 5, 6])
Type Codes:
'i'– Integer'f'– Float'd'– Double- Other codes are available for different types.
3. NumPy Arrays
NumPy is a third-party library that provides a powerful array type designed for numerical computations. NumPy arrays are used extensively in scientific computing and data analysis.
Features:
- Homogeneous Data: All elements must be of the same type.
- Efficient Computation: Optimized for performance, particularly with large datasets.
- Multidimensional: Supports multi-dimensional arrays (matrices, tensors).
Example:
import numpy as np

# Create a NumPy array
my_array = np.array([1, 2, 3, 4, 5])
print(my_array)        # Output: [1 2 3 4 5]
print(my_array[0])     # Output: 1
my_array = np.append(my_array, 6)  # Adds 6 to the end of the array
print(my_array)        # Output: [1 2 3 4 5 6]
Summary
- Lists: Built-in, versatile, and can hold different data types.
arrayModule: More efficient for numerical data of a single type.- NumPy Arrays: Highly efficient for numerical and scientific computing with support for multidimensional arrays.
python array methods
1. List Methods
Python lists come with a variety of built-in methods that help in manipulating the list.
Common List Methods:
append(x): Adds an itemxto the end of the list.my_list = [1, 2, 3]my_list.append(4)print(my_list)# Output: [1, 2, 3, 4]extend(iterable): Extends the list by appending elements from an iterable.my_list = [1, 2, 3]my_list.extend([4, 5])print(my_list)# Output: [1, 2, 3, 4, 5]insert(i, x): Inserts an itemxat a given positioni.my_list = [1, 2, 3]my_list.insert(1, 10)print(my_list)# Output: [1, 10, 2, 3]remove(x): Removes the first occurrence of itemx. RaisesValueErrorif not found.my_list = [1, 2, 3, 2]my_list.remove(2)print(my_list)# Output: [1, 3, 2]pop([i]): Removes and returns the item at the given positioniin the list. If no index is specified,pop()removes and returns the last item.my_list = [1, 2, 3]item = my_list.pop()print(item)# Output: 3print(my_list) # Output: [1, 2]clear(): Removes all items from the list.my_list = [1, 2, 3]my_list.clear()print(my_list)# Output: []index(x[, start[, end]]): Returns the index of the first occurrence of itemx(within optionalstartandendparameters).my_list = [1, 2, 3]index = my_list.index(2)print(index)# Output: 1count(x): Returns the number of occurrences of itemxmy_list = [1, 2, 2, 3]count = my_list.count(2)print(count)# Output: 2sort(key=None, reverse=False): Sorts the items of the list in place (the arguments are optional).my_list = [3, 1, 2]my_list.sort()print(my_list)# Output: [1, 2, 3]reverse(): Reverses the elements of the list in place.my_list = [1, 2, 3]my_list.reverse()print(my_list)# Output: [3, 2, 1]copy(): Returns a shallow copy of the list.my_list = [1, 2, 3]new_list = my_list.copy()print(new_list)# Output: [1, 2, 3]