
Inheritance
Inheritance is a fundamental concept in object-oriented programming (OOP) that allows a new class to inherit properties and behavior (methods) from an existing class. This helps in code reusability and establishing a natural hierarchy between classes.
Key Concepts of Inheritance
- Base Class (Parent Class or Superclass):
- The class whose properties and methods are inherited by another class.
- Example:
Vehiclecan be a base class with attributes likespeedandcolor.
- Derived Class (Child Class or Subclass):
- The class that inherits properties and methods from the base class.
- Example:
Carcan be a derived class that inherits fromVehicleand adds more specific attributes likenumber_of_doors.
- Reusability:
- Inheritance allows code to be reused across different classes, reducing redundancy.
- It promotes the DRY (Don’t Repeat Yourself) principle.
- Hierarchy:
- Inheritance creates a hierarchical relationship between classes, which can represent real-world relationships.
- Example: In an organization,
Employeecould be a base class, with derived classes likeManagerandDeveloper.
Advantages of Inheritance
- Code Reusability:
- Inheritance allows code to be reused, reducing redundancy and improving maintainability.
- Logical Representation:
- It helps represent real-world relationships logically, making the code easier to understand.
- Extensibility:
- New features can be added to existing classes without modifying them, enhancing flexibility.
Disadvantages of Inheritance
- Tight Coupling:
- Inheritance can lead to tight coupling between base and derived classes, making changes more challenging.
- Complexity:
- With multiple levels of inheritance, the class hierarchy can become complex, making the code harder to manage.
- Diamond Problem:
- In multiple inheritance, the diamond problem occurs when two base classes have a common ancestor, leading to ambiguity in inherited properties. Languages like Python use a method resolution order (MRO) to resolve this issue.
In Java, inheritance is a core feature of object-oriented programming that allows a new class to inherit fields and methods from an existing class. This enables code reuse and creates a hierarchical relationship between classes. Let’s explore the different types of inheritance in Java with examples and detailed explanations for each type.
Types of Inheritance in Java
- Single Inheritance
- Multilevel Inheritance
- Hierarchical Inheritance
- Hybrid Inheritance
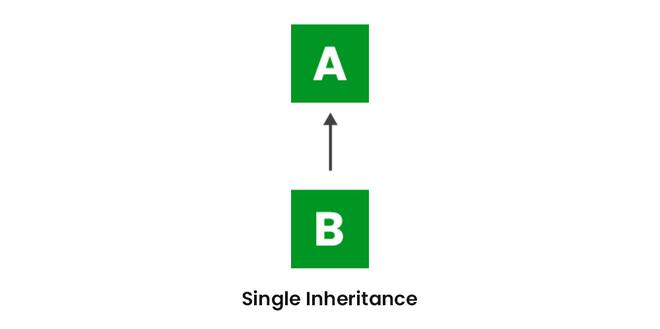
1. Single Inheritance
Definition:
Single inheritance occurs when a class inherits from a single parent class. This is the most straightforward form of inheritance.
Example and Code:
// Parent class
class Animal {
    String name;

    void sound() {
        System.out.println("This animal makes a sound.");
    }
}

// Child class
class Dog extends Animal {
    void sound() {
        System.out.println(name + " barks.");
    }
}

// Main class
public class Main {
    public static void main(String[] args) {
        Dog buddy = new Dog();
        buddy.name = "Buddy";
        buddy.sound();  // Output: Buddy barks.
    }
}
Explanation:
- Animal (Parent Class):
- The
Animalclass has a fieldnameand a methodsound().
- The
- Dog (Child Class):
- The
Dogclass extends theAnimalclass and overrides thesound()method to provide specific behavior.
- The
- Usage:
- An instance of
Dogis created, and thenameis set. buddy.sound()calls the overridden method inDog.
- An instance of
Benefits of Single Inheritance:
- Simplicity: Easy to implement and understand.
- Clear Hierarchy: Direct relationship between parent and child classes.
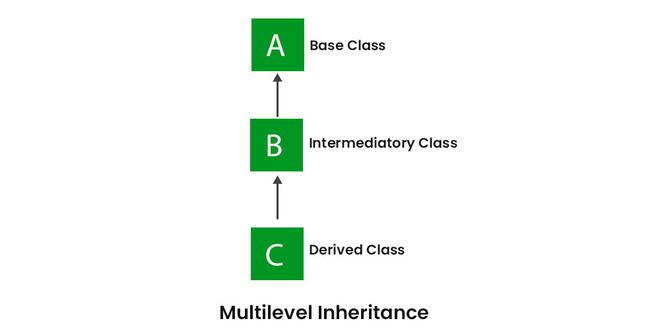
2. Multilevel Inheritance
Definition:
Multilevel inheritance involves a class derived from another derived class, forming a chain of inheritance.
Example and Code:
// Parent class
class Animal {
    String name;

    void sound() {
        System.out.println("This animal makes a sound.");
    }
}

// Intermediate class
class Mammal extends Animal {
    boolean isWarmBlooded = true;

    boolean isWarmBlooded() {
        return isWarmBlooded;
    }
}

// Child class
class Dog extends Mammal {
    void sound() {
        System.out.println(name + " barks.");
    }
}

// Main class
public class Main {
    public static void main(String[] args) {
        Dog buddy = new Dog();
        buddy.name = "Buddy";
        System.out.println(buddy.isWarmBlooded());  // Output: true
        buddy.sound();  // Output: Buddy barks.
    }
}
Explanation:
- Animal (Parent Class):
- The base class provides a field
nameand a methodsound().
- The base class provides a field
- Mammal (Intermediate Class):
- Inherits from
Animaland adds a methodisWarmBlooded()to return whether the mammal is warm-blooded.
- Inherits from
- Dog (Derived Class):
- Inherits from
Mammaland overrides thesound()method to provide specific behavior.
- Inherits from
- Usage:
- An instance of
Dogis created. buddy.isWarmBlooded()calls the method from theMammalclass.buddy.sound()calls the overridden method inDog.
- An instance of
Benefits of Multilevel Inheritance:
- Hierarchical Representation: Represents complex relationships with multiple levels.
- Reusability: Promotes code reuse across multiple levels of hierarchy.
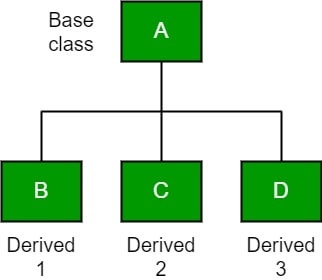
3. Hierarchical Inheritance
Definition:
Hierarchical inheritance occurs when multiple classes inherit from a single parent class.
Example and Code:
// Parent class
class Animal {
    String name;

    void sound() {
        System.out.println("This animal makes a sound.");
    }
}

// First child class
class Dog extends Animal {
    void sound() {
        System.out.println(name + " barks.");
    }
}

// Second child class
class Cat extends Animal {
    void sound() {
        System.out.println(name + " meows.");
    }
}

// Main class
public class Main {
    public static void main(String[] args) {
        Dog buddy = new Dog();
        buddy.name = "Buddy";
        buddy.sound();  // Output: Buddy barks.

        Cat whiskers = new Cat();
        whiskers.name = "Whiskers";
        whiskers.sound();  // Output: Whiskers meows.
    }
}
Explanation:
- Animal (Parent Class):
- Provides a field
nameand a methodsound().
- Provides a field
- Dog and Cat (Child Classes):
- Both inherit from
Animaland override thesound()method to provide specific behavior.
- Both inherit from
- Usage:
- Instances of
DogandCatare created. buddy.sound()andwhiskers.sound()call the overridden methods in their respective classes.
- Instances of
Benefits of Hierarchical Inheritance:
- Simplicity: Provides a clear and straightforward hierarchical structure.
- Reusability: Allows multiple derived classes to reuse code from a common base class.
Multiple Inheritance
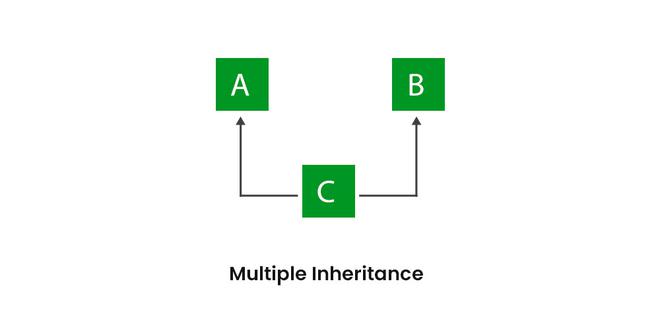
multiple inheritance refers to a scenario where a class can inherit features (methods and fields) from more than one parent class. However, Java does not support multiple inheritance with classes directly due to ambiguity problems, such as the “diamond problem.” Instead, Java achieves multiple inheritance through interfaces, allowing a class to implement multiple interfaces.
Why Multiple Inheritance is Not Supported Directly in Java
The main reason Java doesn’t support multiple inheritance through classes is to avoid the diamond problem. Consider a situation where a class inherits from two classes, both of which have a method with the same signature. If a derived class inherits from these two classes, it becomes unclear which version of the method should be called.
Achieving Multiple Inheritance in Java Using Interfaces
Java allows a class to implement multiple interfaces, which is a way to achieve multiple inheritance without ambiguity.
Interfaces in Java:
- Interfaces are abstract types used to specify methods that must be implemented by classes.
- A class can implement multiple interfaces, inheriting the abstract methods defined in each interface.
Here’s how you can achieve multiple inheritance using interfaces:
Example and Code
// First interface
interface Engine {
    void startEngine();
}

// Second interface
interface Wheels {
    void startWheels();
}

// Implementing both interfaces
class Car implements Engine, Wheels {
    public void startEngine() {
        System.out.println("Engine started.");
    }

    public void startWheels() {
        System.out.println("Wheels started.");
    }

    void drive() {
        System.out.println("Car is driving.");
    }
}

// Main class
public class Main {
    public static void main(String[] args) {
        Car myCar = new Car();
        myCar.startEngine();  // Output: Engine started.
        myCar.startWheels();  // Output: Wheels started.
        myCar.drive();        // Output: Car is driving.
    }
}
Explanation:
- Engine and Wheels (Interfaces):
- Both interfaces declare a method each:
startEngine()andstartWheels(). - Interfaces only declare methods and do not provide implementations.
- Both interfaces declare a method each:
- Car (Implementing Class):
- The
Carclass implements bothEngineandWheels, providing concrete implementations for the methods declared in the interfaces. - The
drive()method is a specific feature of theCarclass.
- The
- Usage:
- An instance of
Caris created. myCar.startEngine()andmyCar.startWheels()call the methods implemented in theCarclass.myCar.drive()demonstrates the specific behavior of theCarclass.
- An instance of
Benefits of Using Interfaces for Multiple Inheritance
- No Ambiguity:
- Since interfaces only declare methods without implementations, there’s no ambiguity about which method to inherit.
- Flexibility:
- Interfaces allow for more flexible design, as a class can implement multiple interfaces and gain a variety of behaviors.
- Decoupling:
- Interfaces promote loose coupling by defining methods that can be implemented independently across different classes.
Challenges of Using Interfaces
- Implementation Required:
- Classes implementing interfaces must provide concrete implementations for all declared methods, which can lead to boilerplate code if many interfaces are used.
- No State Sharing:
- Interfaces cannot hold state (fields), so any shared state needs to be managed in implementing classes.
Summary
While Java does not support multiple inheritance directly through classes to avoid the diamond problem, it achieves similar functionality through interfaces. Interfaces provide a way to declare methods that must be implemented by classes, allowing a single class to inherit from multiple sources without ambiguity.
By leveraging interfaces, Java provides a flexible and powerful way to design software systems that benefit from multiple inheritance while maintaining clarity and simplicity.
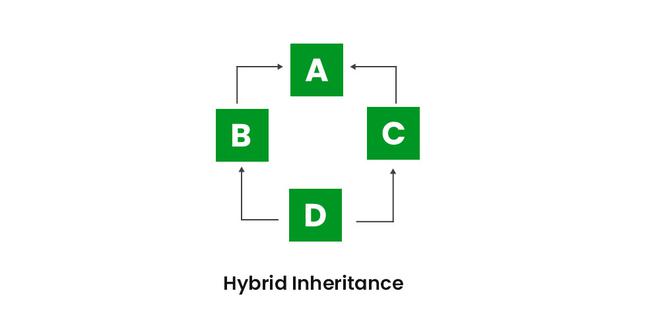
5. Hybrid Inheritance
Definition:
Hybrid inheritance is a combination of two or more types of inheritance. In Java, hybrid inheritance can be implemented using interfaces to avoid issues like the diamond problem.
Example and Code:
// Parent interface 1
interface Engine {
    void startEngine();
}

// Parent interface 2
interface Vehicle {
    void startVehicle();
}

// Implementing interfaces
class Car implements Engine, Vehicle {
    public void startEngine() {
        System.out.println("Engine started.");
    }

    public void startVehicle() {
        System.out.println("Vehicle started.");
    }

    void drive() {
        System.out.println("Car is driving.");
    }
}

// Child class
class SportsCar extends Car {
    void race() {
        System.out.println("SportsCar is racing.");
    }
}

// Main class
public class Main {
    public static void main(String[] args) {
        SportsCar mySportsCar = new SportsCar();
        mySportsCar.startEngine();  // Output: Engine started.
        mySportsCar.startVehicle(); // Output: Vehicle started.
        mySportsCar.drive();        // Output: Car is driving.
        mySportsCar.race();         // Output: SportsCar is racing.
    }
}
Explanation:
- Engine and Vehicle (Parent Interfaces):
- Provide method declarations for
startEngine()andstartVehicle().
- Provide method declarations for
- Car (Implementing Class):
- Implements both
EngineandVehicle, providing definitions for their methods.
- Implements both
- SportsCar (Derived Class):
- Inherits from
Carand adds a methodrace().
- Inherits from
- Usage:
- An instance of
SportsCaris created. mySportsCar.startEngine(),mySportsCar.startVehicle(),mySportsCar.drive(), andmySportsCar.race()call methods from the inheritance hierarchy.
- An instance of
Benefits of Hybrid Inheritance:
- Flexibility: Represents complex relationships with multiple inheritance types.
- Reusability: Combines behaviors from different classes efficiently.
Challenges of Hybrid Inheritance:
- Complexity: Managing complex hierarchies and avoiding issues like the diamond problem require careful design.
- Ambiguity: Requires clear understanding and handling of method resolution to avoid ambiguity.
Summary
In Java, inheritance allows classes to derive properties and behavior from other classes, enabling code reuse and representing hierarchical relationships. Here’s a quick summary of the different types of inheritance:
- Single Inheritance: Inherits from a single parent class, providing a straightforward hierarchy.
- Multilevel Inheritance: Forms a chain of inheritance with multiple levels, representing complex relationships.
- Hierarchical Inheritance: Multiple derived classes inherit from a single parent class, forming a tree-like structure.
- Hybrid Inheritance: Combines multiple inheritance types using interfaces to avoid the diamond problem.
By understanding and utilizing these inheritance types, you can design more flexible and reusable Java code, creating maintainable and scalable software architectures.
Method Overriding and Usage of Super keyword
Method overriding
Method overriding in Java is a fundamental concept of object-oriented programming that allows a subclass to provide a specific implementation of a method that is already defined in its superclass. This feature is crucial for achieving runtime polymorphism, enabling more dynamic and flexible code behavior. In this explanation, we’ll explore method overriding in detail, including rules, examples, and practical use cases.
What is Method Overriding?
Definition:
Method overriding occurs when a subclass defines a method with the same name, return type, and parameters as a method in its superclass. The overridden method in the subclass is used to provide a specific implementation for the method, which will be called on instances of the subclass.
Rules for Method Overriding
- Same Method Signature:
- The overriding method must have the same name, return type, and parameter list as the method in the superclass.
- Access Level:
- The access level of the overriding method cannot be more restrictive than that of the overridden method. For example, if the superclass method is
protected, the subclass method cannot beprivate.
- The access level of the overriding method cannot be more restrictive than that of the overridden method. For example, if the superclass method is
- Exceptions:
- The overriding method can throw any unchecked (runtime) exceptions, regardless of what the overridden method throws.
- If the overridden method throws checked exceptions, the overriding method can only throw the same exceptions or subclasses of those exceptions.
- Static Methods:
- Static methods cannot be overridden. If a subclass defines a static method with the same signature as a static method in the superclass, it hides the superclass method, but this is not considered overriding.
- Final Methods:
- A method declared as
finalin the superclass cannot be overridden.
- A method declared as
- Constructors:
- Constructors cannot be overridden.
Method Overriding Example
Let’s explore a simple example to illustrate method overriding in Java.
// Parent class
class Animal {
    void sound() {
        System.out.println("This animal makes a sound.");
    }
}

// Subclass
class Dog extends Animal {
    @Override
    void sound() {
        System.out.println("Dog barks.");
    }
}

// Main class
public class Main {
    public static void main(String[] args) {
        Animal genericAnimal = new Animal();
        genericAnimal.sound();  // Output: This animal makes a sound.

        Dog buddy = new Dog();
        buddy.sound();  // Output: Dog barks.

        // Polymorphism
        Animal animalRef = new Dog();
        animalRef.sound();  // Output: Dog barks.
    }
}
Explanation:
- Animal (Superclass):
- Defines a method
sound()that outputs a generic message.
- Defines a method
- Dog (Subclass):
- Overrides the
sound()method to provide a specific implementation for dogs.
- Overrides the
- Usage:
genericAnimal.sound()calls the method in theAnimalclass.buddy.sound()calls the overridden method in theDogclass.animalRef.sound()demonstrates polymorphism, where the overridden method in the subclass is called even when the reference is of typeAnimal.
Why Use Method Overriding?
Method overriding is essential for achieving polymorphism in Java. It allows for more dynamic and flexible behavior, enabling objects to interact in ways determined at runtime.
Benefits of Method Overriding:
- Runtime Polymorphism:
- Overriding enables dynamic method dispatch, allowing the correct method to be called at runtime based on the object’s actual type.
- Code Reusability:
- Allows subclasses to reuse and extend the behavior of superclass methods, leading to more maintainable code.
- Flexibility:
- Provides flexibility to change or enhance the behavior of inherited methods in subclasses.
Practical Use Case: Method Overriding
Consider a real-world example involving a payment processing system:
// Parent class
class Payment {
    void processPayment() {
        System.out.println("Processing generic payment.");
    }
}

// Subclass for credit card payments
class CreditCardPayment extends Payment {
    @Override
    void processPayment() {
        System.out.println("Processing credit card payment.");
    }
}

// Subclass for PayPal payments
class PayPalPayment extends Payment {
    @Override
    void processPayment() {
        System.out.println("Processing PayPal payment.");
    }
}

// Main class
public class Main {
    public static void main(String[] args) {
        Payment payment = new Payment();
        payment.processPayment();  // Output: Processing generic payment.

        Payment creditCardPayment = new CreditCardPayment();
        creditCardPayment.processPayment();  // Output: Processing credit card payment.

        Payment payPalPayment = new PayPalPayment();
        payPalPayment.processPayment();  // Output: Processing PayPal payment.

        // Array of payments
        Payment[] payments = {creditCardPayment, payPalPayment};
        for (Payment p : payments) {
            p.processPayment();  // Output: Processing credit card payment.
                                 //         Processing PayPal payment.
        }
    }
}
Explanation:
- Payment (Superclass):
- Provides a generic
processPayment()method.
- Provides a generic
- CreditCardPayment and PayPalPayment (Subclasses):
- Each subclass overrides the
processPayment()method to handle specific payment types.
- Each subclass overrides the
- Usage:
- Instances of
CreditCardPaymentandPayPalPaymentdemonstrate polymorphism. - The array
paymentsillustrates dynamic method dispatch, calling the appropriate overridden method based on the object type.
- Instances of
Method Overriding vs. Method Overloading
It’s important to differentiate between method overriding and method overloading:
- Method Overriding:
- Involves redefining a method in a subclass with the same signature as in its superclass.
- Achieves runtime polymorphism.
- Method Overloading:
- Involves defining multiple methods in the same class with the same name but different parameter lists.
- Achieves compile-time polymorphism.
Summary
Method overriding is a powerful feature of Java’s object-oriented paradigm, allowing subclasses to redefine superclass methods and enabling dynamic behavior through polymorphism. By adhering to the rules of method overriding, developers can create flexible and reusable code that leverages inheritance effectively.
Key points:
- Same Signature: Subclasses override methods with the same name, return type, and parameters.
- Access and Exceptions: Overriding methods must respect access levels and exception constraints.
- Polymorphism: Enables dynamic method dispatch based on object type, promoting flexibility and reusability.
By mastering method overriding, you can design robust Java applications that leverage inheritance and polymorphism to achieve dynamic and scalable solutions.
Usage of Super keyword
The super keyword in Java is a powerful tool used in object-oriented programming, specifically in the context of inheritance. It serves as a reference to the parent class of an object and allows you to access and manipulate methods and variables from the parent class. Understanding super is crucial for effective use of inheritance and polymorphism in Java.
Here’s a detailed explanation of the super keyword, along with its syntax, use cases, and examples:
Understanding the super Keyword
What is super?
The super keyword is used to refer to the immediate parent class object. It is primarily used in three contexts:
- To Access Parent Class Methods: You can use
superto call a method from the parent class that has been overridden in the child class. - To Access Parent Class Variables: When the child class has variables with the same name as the parent class,
superhelps distinguish between them. - To Invoke Parent Class Constructor:
superis used to explicitly call the constructor of the parent class.
Syntax
The syntax for using super varies depending on its use:
- Calling Parent Class Method:
super.methodName(); - Accessing Parent Class Variable:
super.variableName; - Calling Parent Class Constructor:
super(parameters);
Using super to Call Superclass Constructors
When a subclass constructor is invoked, it may want to call the constructor of its superclass to ensure that the superclass is initialized properly. The super keyword can be used to call a specific constructor in the superclass.
Example
// Superclass
class Animal {
    String name;

    // Constructor
    Animal(String name) {
        this.name = name;
        System.out.println("Animal constructor called.");
    }
}

// Subclass
class Dog extends Animal {
    int age;

    // Constructor
    Dog(String name, int age) {
        super(name); // Call superclass constructor
        this.age = age;
        System.out.println("Dog constructor called.");
    }
}

// Main class
public class Main {
    public static void main(String[] args) {
        Dog buddy = new Dog("Buddy", 3);
        // Output:
        // Animal constructor called.
        // Dog constructor called.
    }
}
Explanation:
- Animal (Superclass):
- The
Animalclass has a constructor that initializes thenamefield and prints a message.
- The
- Dog (Subclass):
- The
Dogclass has a constructor that calls theAnimalconstructor usingsuper(name). - This ensures the
namefield is initialized before setting theagefield and printing a message.
- The
- Usage:
- When creating a
Dogobject, both constructors are invoked, starting with theAnimalconstructor.
- When creating a
Key Points:
- The call to
super()must be the first statement in the subclass constructor. - If no
super()call is explicitly made, Java automatically inserts a no-argumentsuper()call if the superclass has a no-argument constructor.
Using super to Access Superclass Methods
The super keyword is also used to call methods in the superclass that have been overridden in the subclass.
Example
// Superclass
class Animal {
    void sound() {
        System.out.println("This animal makes a sound.");
    }
}

// Subclass
class Dog extends Animal {
    @Override
    void sound() {
        super.sound(); // Call superclass method
        System.out.println("Dog barks.");
    }
}

// Main class
public class Main {
    public static void main(String[] args) {
        Dog buddy = new Dog();
        buddy.sound();
        // Output:
        // This animal makes a sound.
        // Dog barks.
    }
}
Explanation:
- Animal (Superclass):
- Defines a method
sound()that outputs a generic message.
- Defines a method
- Dog (Subclass):
- Overrides the
sound()method and callssuper.sound()to invoke theAnimalmethod before executing its own behavior.
- Overrides the
- Usage:
- Calling
buddy.sound()invokes both the superclass and subclass methods, demonstrating howsupercan be used to extend or modify inherited behavior.
- Calling
Using super to Access Superclass Fields
The super keyword can be used to access fields in the superclass when they are hidden by subclass fields.
Example
// Superclass
class Animal {
    String name = "Generic Animal";
}

// Subclass
class Dog extends Animal {
    String name = "Buddy";

    void displayNames() {
        System.out.println("Subclass name: " + name);       // Access subclass field
        System.out.println("Superclass name: " + super.name); // Access superclass field
    }
}

// Main class
public class Main {
    public static void main(String[] args) {
        Dog buddy = new Dog();
        buddy.displayNames();
        // Output:
        // Subclass name: Buddy
        // Superclass name: Generic Animal
    }
}
Explanation:
- Animal (Superclass):
- Contains a field
nameinitialized to"Generic Animal".
- Contains a field
- Dog (Subclass):
- Defines its own
namefield, hiding the superclass field.
- Defines its own
- Usage:
- The
displayNames()method demonstrates accessing both the subclass and superclassnamefields usingsuper.
- The
Concept of Interfaces
In Java, interfaces are a fundamental concept of object-oriented programming that allow for abstraction and multiple inheritance. An interface defines a contract or a blueprint for classes, specifying a set of methods that a class must implement. Unlike abstract classes, interfaces do not provide any implementation for the methods they declare. They allow classes to implement multiple interfaces, providing a way to achieve multiple inheritance in Java.
Uses of Interfaces in Java
- It is used to achieve total abstraction.
- Since java does not support multiple inheritances in the case of class, by using an interface it can achieve multiple inheritances.
- Any class can extend only 1 class, but can any class implement an infinite number of interfaces.
- It is also used to achieve loose coupling.
- Interfaces are used to implement abstraction.
Key Features of Interfaces
- Abstract Methods:
- Interfaces primarily contain abstract methods, which are method signatures without any implementation.
- From Java 8 onwards, interfaces can also have default and static methods with implementations.
- Multiple Inheritance:
- A class can implement multiple interfaces, allowing for multiple inheritance of type.
- Constants:
- Interfaces can declare constants, which are implicitly
public,static, andfinal.
- Interfaces can declare constants, which are implicitly
- No Constructor:
- Interfaces cannot be instantiated and do not have constructors.
- Implementation:
- A class that implements an interface must provide concrete implementations for all its methods unless the class is abstract.
- Interface Inheritance:
- Interfaces can extend other interfaces, allowing for a hierarchy of interfaces.
Defining and Implementing an Interface
Let’s explore how to define and implement an interface in Java with examples.
Defining an Interface
// Interface definition
interface Vehicle {
    // Abstract method
    void start();

    // Abstract method
    void stop();

    // Constant
    int MAX_SPEED = 120; // Implicitly public, static, and final
}
Explanation:
- Interface Declaration:
- The
Vehicleinterface declares two abstract methods:start()andstop(). - It also defines a constant
MAX_SPEED.
- The
Implementing an Interface
A class can implement an interface by providing concrete implementations for its abstract methods.
// Class implementing the interface
class Car implements Vehicle {
    @Override
    public void start() {
        System.out.println("Car is starting.");
    }

    @Override
    public void stop() {
        System.out.println("Car is stopping.");
    }
}

// Main class
public class Main {
    public static void main(String[] args) {
        Car myCar = new Car();
        myCar.start();  // Output: Car is starting.
        myCar.stop();   // Output: Car is stopping.

        System.out.println("Max speed: " + Vehicle.MAX_SPEED);  // Output: Max speed: 120
    }
}
Explanation:
- Car (Implementing Class):
- Implements the
Vehicleinterface by providing concrete implementations forstart()andstop(). - Uses the
@Overrideannotation to indicate that the methods are being overridden.
- Implements the
- Main Class:
- Creates an instance of
Carand calls its methods. - Accesses the constant
MAX_SPEEDfrom theVehicleinterface.
- Creates an instance of
Difference Between Abstract classes and Interface
| Feature | Abstract Class | Interface |
|---|---|---|
| Purpose | Provides a common base with shared code. | Defines a contract for classes to implement. |
| Inheritance | A class can extend only one abstract class. | A class can implement multiple interfaces. |
| Methods | Can have abstract methods (without implementation) and concrete methods (with implementation). | Primarily abstract methods (no implementation), but can have default and static methods (Java 8+). |
| Fields | Can have instance variables (fields) with any access modifiers and can be initialized. | Can only have public, static, and final fields (constants). |
| Constructors | Can have constructors. | Cannot have constructors. |
| Access Modifiers for Methods | Methods can have any access modifier (e.g., protected, public). | Methods are implicitly public, and abstract methods must be public. |
| Implementation | A class extending an abstract class inherits both abstract and concrete methods. | A class implementing an interface must provide implementations for all abstract methods. |
| Multiple Inheritance | Java does not support multiple inheritance of classes. | A class can implement multiple interfaces, enabling multiple inheritance of type. |
| Instantiation | Cannot instantiate an abstract class directly. | Cannot instantiate an interface directly. |
| Default Methods | Not applicable. | Can have default methods with implementations (Java 8+). |
| Static Methods | Can have static methods with implementations. | Can have static methods with implementations (Java 8+). |
| Use Case | Use when there is a common base class with shared behavior and state. | Use to define a common set of methods that multiple classes can implement, supporting multiple inheritance. |
| Abstract vs. Concrete | Can mix abstract and concrete methods. | Primarily abstract methods; methods in interfaces can be default or static. |
Package
packages are a fundamental concept used to group related classes, interfaces, and sub-packages. They help organize code, control access, and avoid name conflicts. Packages also play a crucial role in managing the structure of large codebases and enhancing modularity.
Overview of Java Packages
- Encapsulation and Organization:
- Encapsulation: Packages help in grouping related classes and interfaces together. This encapsulation hides the implementation details and exposes only what is necessary.
- Organization: Packages help in organizing code in a hierarchical structure, which makes managing large codebases easier.
- Preventing Naming Conflicts:
- Java allows classes with the same name in different packages. For instance,
college.staff.cse.Employeeandcollege.staff.ee.Employeecan coexist without conflict.
- Java allows classes with the same name in different packages. For instance,
- Ease of Use:
- Packages simplify the process of locating and using classes. By importing a package, you can access its classes and interfaces in your code.
- Access Control:
- Protected Access: Members marked
protectedare accessible within the same package and by subclasses. - Default Access: Members with no access modifier (default) are accessible only within the same package.
- Protected Access: Members marked
How Packages Work
- Directory Structure: The directory structure reflects the package structure. For example, the package
college.staff.csecorresponds to the directoriescollege,staff, andcse. - CLASSPATH: The
CLASSPATHenvironment variable specifies the location of the root directory of your package structure. Java uses this to locate and load classes.
Naming Conventions
- Reverse Domain Name: Packages are typically named using the reverse order of domain names to ensure uniqueness. For instance, a company might use
com.example.myappfor their packages. - Example Packages: For a college application, the packages might be
college.tech.cse,college.tech.ee,college.art.history, etc.
Adding Classes to Packages
- Creating a Class: To add a class to a package, you declare the package at the top of your Java file. For instance:
package college.tech.cse;public class Student {// Class implementation} - Compiling: Ensure the file is saved in the corresponding directory structure and then compile it. The compiled
.classfile will be placed in the same directory.
Subpackages
- Definition: A subpackage is a package within another package. For example,
java.utilis a package, andjava.util.concurrentis a subpackage. - Importing: Subpackages must be explicitly imported if their classes are needed. The import statement for a subpackage looks like:
import java.util.concurrent.*;
This structured approach helps maintain modularity and reusability in Java programs, making the codebase easier to manage and navigate.
Concept of Access Protection
In Java, access protection is a mechanism used to control the visibility and accessibility of classes, methods, and fields. This feature is fundamental to encapsulation and helps in maintaining security and integrity within code by restricting access to certain parts of an application. Java provides four main access levels, each with different levels of visibility:
Access Modifiers
publicprotected- default (no modifier)
private
Here’s a detailed explanation of each access modifier and their effects:
| Access Modifier | Visibility | Description | Usage Example |
|---|---|---|---|
public | Any class in any package | The member is accessible from any other class, regardless of the package. | public class MyClass {} |
protected | Same package and subclasses (in any package) | The member is accessible within the same package and by subclasses, even if they are in different packages. | protected void myMethod() {} |
| default (no modifier) | Same package only | The member is accessible only within its own package. It is also called package-private. | void myMethod() {} |
private | Same class only | The member is accessible only within the class where it is declared. | private int myField; |
Detailed Explanation
1. public Access Modifier
- Description:
- Members marked as
publicare accessible from any other class, regardless of the package. This is the least restrictive access level.
- Members marked as
- Usage Example:
// File: com/example/PublicClass.java
package com.example;

public class PublicClass {
    public int publicField;

    public void publicMethod() {
        // Method implementation
    }
}
Explanation:
PublicClass and its members are accessible from any other class, anywhere in the application.
2. protected Access Modifier
- Description:
- Members marked as
protectedare accessible within the same package and by subclasses in other packages. This modifier is often used to allow controlled access to superclass members by subclasses.
- Members marked as
- Usage Example:
// File: com/example/ProtectedClass.java
package com.example;

public class ProtectedClass {
    protected int protectedField;

    protected void protectedMethod() {
        // Method implementation
    }
}
// File: com/example/sub/DerivedClass.java
package com.example.sub;
import com.example.ProtectedClass;
public class DerivedClass extends ProtectedClass {
public void accessProtected() {
// Accessible due to inheritance
protectedField = 10;
protectedMethod();
}
}
Explanation:
ProtectedClass and its members are accessible within its own package and by DerivedClass in a different package due to inheritance.3. Default (Package-Private) Access Modifier
- Description:
- If no access modifier is specified, the member is accessible only within its own package. This is also known as package-private access.
- Usage Example:
// File: com/example/DefaultClass.java
package com.example;

class DefaultClass {
    int defaultField; // Package-private

    void defaultMethod() {
        // Method implementation
    }
}
// File: com/example/AnotherClass.java
package com.example;
public class AnotherClass {
public void accessDefault() {
DefaultClass dc = new DefaultClass();
dc.defaultField = 10; // Accessible within the same package
dc.defaultMethod(); // Accessible within the same package
}
}
Explanation:
DefaultClass and its members are accessible only within the com.example package.4. private Access Modifier
- Description:
- Members marked as
privateare accessible only within the class where they are declared. This is the most restrictive access level and is used to encapsulate data and methods that should not be exposed outside the class.
- Members marked as
- Usage Example:
// File: com/example/PrivateClass.java
package com.example;

public class PrivateClass {
    private int privateField;

    private void privateMethod() {
        // Method implementation
    }

    public void publicMethod() {
        privateField = 10;  // Accessible within the same class
        privateMethod();   // Accessible within the same class
    }
}
Explanation:
privateField and privateMethod() are only accessible within PrivateClass. They are not accessible from outside the class, including from subclasses or other classes in the same package.| Access Modifier | Class | Same Package | Subclass (Different Package) | Other Classes (Different Package) |
|---|---|---|---|---|
public | Yes | Yes | Yes | Yes |
protected | Yes | Yes | Yes | No |
| default | Yes | Yes | No | No |
private | Yes | No | No | No |
Best Practices
- Encapsulation: Use
privateto encapsulate data and provide controlled access viapublicorprotectedmethods if needed. - Controlled Access: Use
protectedfor members that should be accessible to subclasses but not to other classes. - Package Organization: Use default access to limit access to within the same package, which is useful for package-private utility classes.
By understanding and properly utilizing access modifiers, you can design classes that are more secure, modular, and easier to maintain.
Mechanism of Importing Packages
1. Using import package.*;
This import statement allows you to include all classes and interfaces from a specific package. It does not include classes from sub-packages.
Syntax:
import package_name.*;Detailed Example:
Suppose you have a package com.example.util with multiple classes.
File: com/example/util/Helper.java
package com.example.util;

public class Helper {
    public static void printMessage() {
        System.out.println("Hello from Helper class!");
    }
}
File: com/example/util/Utility.java
package com.example.util;

public class Utility {
    public static void displayInfo() {
        System.out.println("Hello from Utility class!");
    }
}
File: com/example/Main.java
package com.example;

// Importing all classes from com.example.util package
import com.example.util.*;

public class Main {
    public static void main(String[] args) {
        // Using imported classes
        Helper.printMessage();  // Output: Hello from Helper class!
        Utility.displayInfo();  // Output: Hello from Utility class!
    }
}
Explanation:
- Import Statement:
import com.example.util.*;imports all classes and interfaces from thecom.example.utilpackage.- You can now use
HelperandUtilitywithout specifying their full package names.
- Limitation:
- This does not import classes from sub-packages (e.g.,
com.example.util.sub). Each sub-package must be imported separately if needed.
- This does not import classes from sub-packages (e.g.,
2. Using Fully Qualified Names
You can directly use the fully qualified name of a class or interface, which includes the complete package path, to reference it without importing.
Syntax:
package_name.ClassName
Detailed Example:
Assume the same package structure as before:
File: com/example/util/Helper.java
package com.example.util;

public class Helper {
    public static void printMessage() {
        System.out.println("Hello from Helper class!");
    }
}
File: com/example/Main.java
package com.example;

public class Main {
    public static void main(String[] args) {
        // Using fully qualified name to refer to Helper class
        com.example.util.Helper.printMessage();  // Output: Hello from Helper class!
    }
}
Explanation:
- Fully Qualified Name:
com.example.util.Helper.printMessage();uses the complete path to theHelperclass.- This approach does not require an import statement but makes the code longer and less readable.
- Usage:
- Useful when you want to avoid potential conflicts or when only occasionally using a class from a package.
3. Using import package.ClassName;
This import statement is used to import a specific class or interface from a package. This is more precise and helps avoid potential conflicts compared to wildcard imports.
Syntax:
import package_name.ClassName;
Detailed Example:
File: com/example/util/Helper.java
package com.example.util;

public class Helper {
    public static void printMessage() {
        System.out.println("Hello from Helper class!");
    }
}
File: com/example/Main.java
package com.example;

// Importing only the Helper class from com.example.util package
import com.example.util.Helper;

public class Main {
    public static void main(String[] args) {
        // Using the imported class
        Helper.printMessage();  // Output: Hello from Helper class!
    }
}
Explanation:
- Specific Import:
import com.example.util.Helper;imports only theHelperclass fromcom.example.util.- This makes
Helperavailable without needing to use the fully qualified name and avoids importing unnecessary classes.
- Advantage:
- Keeps code clean and manageable by importing only what is needed.
Best Practices
- Use Specific Imports: Prefer
import package.ClassName;for clarity and to avoid potential conflicts. - Avoid Wildcard Imports: Wildcard imports (
import package.*;) can lead to ambiguity and may make it unclear which classes are being used. - Fully Qualified Names: Useful for occasional references or to avoid naming conflicts, but generally less readable than using import statements.
By understanding and using these import mechanisms effectively, you can manage your Java code more efficiently, ensuring that your classes and interfaces are organized and accessible as needed.
1. Single-Class Import
To import a specific class or interface from a package, use the import statement followed by the fully qualified name of the class or interface.
Syntax:
import package_name.ClassName;
Example:
Let’s assume you have the following classes in different packages:
File: com/example/util/Helper.java
package com.example.util;

public class Helper {
    public static void printMessage() {
        System.out.println("Hello from Helper class!");
    }
}
File: com/example/Main.java
package com.example;

import com.example.util.Helper;

public class Main {
    public static void main(String[] args) {
        Helper.printMessage();  // Output: Hello from Helper class!
    }
}
Explanation:
- Import Statement:
import com.example.util.Helper;imports theHelperclass from thecom.example.utilpackage.
- Usage:
- The
printMessage()method from theHelperclass is called in theMainclass.
- The
2. Importing All Classes from a Package
To import all classes and interfaces from a package, use the wildcard character *. This does not include classes from sub-packages.
Syntax:
import package_name.*;
Example:
Assume you have multiple classes in the com.example.util package.
File: com/example/util/Helper.java
package com.example.util;

public class Helper {
    public static void printMessage() {
        System.out.println("Hello from Helper class!");
    }
}
File: com/example/util/Utility.java
package com.example.util;

public class Utility {
    public static void displayInfo() {
        System.out.println("Hello from Utility class!");
    }
}
File: com/example/Main.java
package com.example;

import com.example.util.*;

public class Main {
    public static void main(String[] args) {
        Helper.printMessage();  // Output: Hello from Helper class!
        Utility.displayInfo();  // Output: Hello from Utility class!
    }
}
Explanation:
- Wildcard Import:
import com.example.util.*;imports all classes and interfaces from thecom.example.utilpackage.
- Usage:
- Both
HelperandUtilityclasses are used in theMainclass.
- Both
3. Importing Static Members
To import static methods or fields from a class, use the import static statement. This allows you to access static members without specifying the class name.
Syntax:
import static package_name.ClassName.staticMember;To import all static members from a class, use the wildcard *.
javaCopy codeimport static package_name.ClassName.*;
Example:
File: com/example/util/MathUtils.java
package com.example.util;

public class MathUtils {
    public static final double PI = 3.14159;

    public static double square(double number) {
        return number * number;
    }
}
File: com/example/Main.java
package com.example;

import static com.example.util.MathUtils.*;

public class Main {
    public static void main(String[] args) {
        double radius = 5.0;
        double area = PI * square(radius);
        System.out.println("Area of the circle: " + area);  // Output: Area of the circle: 78.53975
    }
}
Explanation:
- Static Import:
import static com.example.util.MathUtils.*;imports all static members from theMathUtilsclass.
- Usage:
PIandsquare()are used directly in theMainclass without needing to qualify them withMathUtils..
4. Importing Classes from Sub-Packages
If you want to use classes from a sub-package, you need to import them separately. Wildcard imports only apply to the package level, not sub-packages.
Example:
Assume the following package structure:
File: com/example/sub/AdditionalHelper.java
package com.example.sub;

public class AdditionalHelper {
    public static void showMessage() {
        System.out.println("Hello from AdditionalHelper class!");
    }
}
File: com/example/Main.java
package com.example;

import com.example.sub.AdditionalHelper;

public class Main {
    public static void main(String[] args) {
        AdditionalHelper.showMessage();  // Output: Hello from AdditionalHelper class!
    }
}
Explanation:
- Direct Import:
import com.example.sub.AdditionalHelper;imports theAdditionalHelperclass from thecom.example.subpackage.
- Usage:
- The
showMessage()method is called in theMainclass.
- The
Summary
- Single-Class Import: Use
import package_name.ClassName;to import a specific class or interface. - Wildcard Import: Use
import package_name.*;to import all classes and interfaces from a package. - Static Import: Use
import static package_name.ClassName.staticMember;to import static members from a class. - Sub-Package Import: Import classes from sub-packages individually as needed.
By utilizing these import mechanisms, you can manage dependencies and code organization effectively in Java.