
Introduction of Java
Java is a high-level, class-based, object-oriented programming language that is designed to have as few implementation dependencies as possible. It was developed by Sun Microsystems (which has since been acquired by Oracle Corporation) and released in 1995. Java is known for its portability, scalability, and robustness, making it a popular choice for a wide range of applications, from web development to mobile apps and enterprise software.
Here are some key points about Java:
Key Features of Java
- Object-Oriented:
Java is based on the object-oriented programming paradigm, which allows for concepts like inheritance, encapsulation, polymorphism, and abstraction. This makes Java programs modular, flexible, and easy to maintain. - Platform Independence:
Java is designed to be platform-independent at both the source and binary levels, which means that Java programs can be run on any device that has a Java Virtual Machine (JVM). This is often summed up by the phrase “write once, run anywhere” (WORA). - Automatic Memory Management (Garbage Collection):
Java handles memory management automatically with its built-in garbage collector, which helps in reclaiming memory used by objects that are no longer needed, reducing the chances of memory leaks. - Robust and Secure:
Java provides a range of built-in security features, such as bytecode verification and runtime security checks, making it a secure option for developing applications. It is also robust, with strong memory management and exception handling capabilities. - Rich Standard Library:
Java comes with a comprehensive standard library that provides a wide array of ready-to-use functionalities, from data structures and networking to graphics and user interface development. - Multithreading:
Java supports multithreading, allowing for the concurrent execution of two or more parts of a program. This feature is crucial for developing applications that require multitasking. - Distributed Computing:
Java is designed with networking capabilities in mind, making it suitable for building distributed applications. It has APIs that simplify the development of network-centric applications.
Advantages of Java
- Portability: Java’s ability to run on various platforms without modification is a significant advantage.
- Robustness: Java’s strong memory management and error-checking mechanisms make it a reliable choice for applications.
- Security: Java’s comprehensive security features help protect applications from threats.
- Scalability: Java’s multithreading and enterprise capabilities make it suitable for both small and large-scale applications.
- Community Support: Java has a large and active community, providing extensive resources, libraries, and frameworks.
Disadvantages of Java
- Performance: While Java’s performance has improved over the years, it can be slower compared to languages like C or C++ due to its abstraction and garbage collection.
- Memory Consumption: Java applications tend to consume more memory compared to programs written in some other languages.
- Verbosity: Java’s syntax can be verbose, making code longer and potentially harder to read compared to more concise languages like Python.
Applications of Java
- Web Applications: Java is widely used for building dynamic web applications, especially in enterprise settings, using technologies like JavaServer Pages (JSP) and servlets.
- Mobile Applications: Java is the primary language for developing Android applications.
- Enterprise Software: Many enterprise-level applications are built using Java due to its scalability and robust features.
- Desktop GUI Applications: Java can be used to create desktop applications with graphical user interfaces using libraries like JavaFX and Swing.
- Scientific Applications: Java is used in scientific research for simulations and data analysis due to its portability and performance.
Overall, Java’s combination of features, platform independence, and strong community support has made it one of the most popular programming languages for a wide range of applications.
where we will use java in our real life:
1. Android Applications
- Mobile Apps: Java is the primary language used for Android app development. Most Android apps are written in Java or Kotlin, which runs on the Java Virtual Machine (JVM).
- Games: Many popular mobile games are developed using Java due to its performance and ability to run on various devices.
2. Web Applications
- Enterprise Web Applications: Java is widely used to build large-scale, enterprise-level web applications using frameworks like Spring, Struts, and JavaServer Faces (JSF). Companies use Java to develop complex web systems that require security, performance, and scalability.
- E-commerce Platforms: Many e-commerce platforms are built using Java because of its ability to handle high traffic and complex transactions securely. Examples include Amazon and eBay.
3. Desktop Applications
- GUI Applications: Java is used to create cross-platform desktop applications using libraries like JavaFX and Swing. Examples include IDEs (Integrated Development Environments) like Eclipse and IntelliJ IDEA, which are used for software development.
4. Scientific Applications
- Data Analysis and Simulation: Java is used in scientific research for simulations, modeling, and data analysis due to its portability and robustness. It is often used in scientific computing environments that require platform independence.
- Mathematical Applications: Libraries like Apache Commons Math and JScience enable Java to be used in mathematical computations and simulations.
5. Enterprise Software
- Enterprise Resource Planning (ERP): Java is used to develop ERP systems that help organizations manage business processes. These systems require scalability, reliability, and the ability to handle large amounts of data.
- Customer Relationship Management (CRM): Java-based CRM systems help businesses manage customer interactions and improve relationships with customers.
6. Financial Services
- Banking Applications: Java is extensively used in the banking sector to develop applications that require high security, reliability, and performance. Many banking institutions use Java for transaction management and data processing.
Difference between Java and c++
| Feature | Java | C++ |
|---|
| Design Philosophy | Designed to be simple and platform-independent | Designed for system-level programming with more control over hardware resources |
| Platform Independence | Write once, run anywhere (WORA) with JVM | Platform-dependent, needs recompilation for different systems |
| Compilation and Execution | Compiled to bytecode, executed by JVM (interpreter) | Compiled to native machine code |
| Memory Management | Automatic garbage collection | Manual memory management (using pointers) |
| Syntax | More restrictive, focuses on simplicity and safety | More flexible, allowing low-level manipulation |
| Object-Oriented Features | Purely object-oriented, everything is an object | Supports both procedural and object-oriented programming |
| Multiple Inheritance | Not supported directly (interfaces are used instead) | Supported with some complexities |
| Operator Overloading | Not supported | Supported |
| Pointers | No direct pointer manipulation allowed | Full support for pointers and pointer arithmetic |
| Exception Handling | Built-in exception handling with try-catch | Supports exception handling but less integrated |
| Templates/Generics | Uses generics, type information is erased at runtime (type erasure) | Uses templates, more powerful and flexible |
| Standard Library | Rich standard library with a wide range of utilities | Standard Template Library (STL) for collections and algorithms |
| Performance | Generally slower due to JVM overhead | Typically faster, closer to hardware |
| Use Cases | Mobile apps, web applications, enterprise software | Game development, system software, high-performance applications |
| Concurrency | Built-in support with multithreading features | Supports multithreading with more manual control |
| Community and Ecosystem | Large community, extensive documentation and frameworks | Strong community, widely used in competitive programming and systems development |
| Memory Safety | Provides memory safety through automatic memory management | Requires careful handling of memory allocation and deallocation |
Features of Java
Java is a popular programming language known for its simplicity, robustness, and versatility. Here are some of the key features that make Java stand out:
1. Object-Oriented
- Encapsulation: Java supports encapsulation by allowing data and methods to be bundled together within classes, ensuring that data is accessed and modified through well-defined interfaces.
- Inheritance: Java supports inheritance, allowing new classes to be created based on existing classes, promoting code reuse and the creation of hierarchical class structures.
- Polymorphism: Java enables polymorphism, allowing objects to be treated as instances of their parent class, which facilitates flexible and dynamic code.
- Abstraction: Java allows abstraction through the use of abstract classes and interfaces, enabling the creation of complex systems by simplifying the handling of complex data and operations.
2. Platform Independence
- Write Once, Run Anywhere (WORA): Java programs are compiled into bytecode, which can run on any device with a Java Virtual Machine (JVM). This platform independence means that Java applications can run on various operating systems without modification.
3. Automatic Memory Management
- Garbage Collection: Java has built-in garbage collection, which automatically handles memory deallocation for objects that are no longer in use, helping to prevent memory leaks and simplifying memory management for developers.
4. Robust and Secure
- Exception Handling: Java provides strong exception handling mechanisms, allowing developers to write reliable and error-resistant code.
- Security Features: Java has a comprehensive security model that includes features like bytecode verification, class loading restrictions, and a security manager, making it suitable for networked and distributed applications.
5. Rich Standard Library
- Java API: Java comes with a rich set of standard libraries that provide a wide range of functionalities, including data structures, networking, file I/O, and GUI development. This extensive library simplifies the development of complex applications.
6. Multithreading
- Concurrent Execution: Java supports multithreading, allowing multiple threads to run concurrently within a program. This is useful for tasks that can be performed in parallel, such as handling multiple user requests or performing background operations.
7. Distributed Computing
- RMI and EJB: Java supports distributed computing through technologies like Remote Method Invocation (RMI) and Enterprise JavaBeans (EJB), enabling the development of distributed and networked applications.
8. High Performance
- Just-In-Time (JIT) Compiler: Java uses a JIT compiler that converts bytecode into native machine code at runtime, improving performance by optimizing frequently executed code paths.
10. Portability
- Cross-Platform Compatibility: Java’s platform independence and the availability of JVMs for various platforms ensure that Java applications can run consistently across different systems.
11. Ease of Use
- Simple Syntax: Java’s syntax is designed to be easy to read and write, making it accessible for beginners and reducing the complexity of software development.
12. Strong Community Support
- Open Source: Java has a large and active community of developers, which contributes to its rich ecosystem of libraries, frameworks, and tools. This community support makes it easier to find solutions and resources for Java development.
13. Network-Centric
- Built-in Networking: Java has built-in support for networking with its extensive libraries for handling network operations, making it suitable for developing web-based and distributed applications.
Conclusion
Java’s combination of object-oriented features, platform independence, and robust standard libraries make it a versatile and widely-used programming language. Its ability to run on multiple platforms, manage memory automatically, and support multithreading and distributed computing makes it suitable for a wide range of applications, from web development to enterprise software and mobile applications.
Byte codes of java and Jvm
Java Bytecode and JVM
Java bytecode and the Java Virtual Machine (JVM) are fundamental concepts that contribute to Java’s platform independence and portability. Let’s explore what they are and how they work together.
Java Bytecode
What is Bytecode?
- Definition: Java bytecode is an intermediate, platform-independent representation of a Java program. It is the result of compiling Java source code using the Java compiler (
javac). - Format: Bytecode is a set of instructions similar to machine code but designed to be executed by the JVM rather than directly by the hardware.
- File Extension: Bytecode is stored in
.classfiles, which contain the compiled code for Java classes.
Why Bytecode?
- Platform Independence: Bytecode allows Java programs to be “write once, run anywhere” because it can be executed on any device that has a compatible JVM.
- Security and Portability: Bytecode enhances security by abstracting machine-specific details and providing a consistent execution environment across different platforms.
Compilation Process
- Java Source Code: The developer writes Java source code in
.javafiles. - Compilation: The Java compiler (
javac) translates the source code into bytecode, resulting in one or more.classfiles. - Execution: The JVM loads the bytecode and executes it on the target machine.
Java Virtual Machine (JVM)
What is the JVM?
- Definition: The JVM is an abstract computing machine that enables Java bytecode to be executed on any platform. It acts as a runtime engine for Java applications.
- Responsibilities:
- Class Loading: Loads Java classes at runtime.
- Bytecode Verification: Ensures that bytecode is valid and safe to execute.
- Execution: Interprets or compiles bytecode into native machine code using techniques like Just-In-Time (JIT) compilation.
- Memory Management: Manages memory allocation and garbage collection for Java objects.
Components of the JVM
- Class Loader: Responsible for loading classes into memory.
- Bytecode Verifier: Checks the correctness and safety of bytecode before execution.
- Interpreter: Executes bytecode instructions.
- Just-In-Time (JIT) Compiler: Compiles bytecode to native machine code for improved performance.
- Garbage Collector: Automatically manages memory by reclaiming memory used by objects that are no longer needed.
- Runtime Data Areas: Includes memory areas such as the heap, stack, and method area, where data is stored during execution.
How JVM Executes Java Bytecode
- Loading: The class loader loads the required
.classfiles into memory. - Verification: The bytecode verifier checks for illegal code that could violate security constraints.
- Execution:
- Interpreter: Initially interprets bytecode instructions one by one.
- JIT Compilation: Frequently executed code paths are compiled to native code for faster execution.
- Garbage Collection: The JVM automatically handles memory deallocation, freeing up memory for unused objects.
Advantages of Java Bytecode and JVM
- Portability: Programs can run on any platform with a JVM, making Java applications highly portable.
- Security: The JVM provides a secure execution environment with bytecode verification and runtime checks.
- Performance: The JIT compiler optimizes code execution by translating bytecode to native machine code.
- Memory Management: Automatic garbage collection reduces the risk of memory leaks and simplifies development.
Summary
Java bytecode and the JVM are critical components of the Java platform, enabling its “write once, run anywhere” capability. Bytecode provides platform independence, while the JVM ensures security, performance, and memory management, making Java a versatile and powerful language for developing a wide range of applications.
Primitive Data types of Java
In Java, primitive data types are the most basic data types built into the language. They are not objects and represent simple values directly, providing efficient access and manipulation of data. Java has eight primitive data types, each serving a specific purpose and having a fixed size. Let’s take a closer look at each of them:

| Data Type | Size (bits) | Default Value | Description |
|---|---|---|---|
byte | 8 | 0 | 8-bit signed integer |
short | 16 | 0 | 16-bit signed integer |
int | 32 | 0 | 32-bit signed integer |
long | 64 | 0L | 64-bit signed integer |
float | 32 | 0.0f | 32-bit floating-point number |
double | 64 | 0.0d | 64-bit floating-point number |
char | 16 | ‘\u0000’ | 16-bit Unicode character |
boolean | 1 (not precise) | false | Boolean value (true or false) |
1. byte
- Size: 8 bits
- Range: -128 to 127
- Use: Efficiently stores large arrays in memory where the memory savings are crucial. It’s also used in file handling and network protocols.
Example:
byte b = 100;
2. short
- Size: 16 bits
- Range: -32,768 to 32,767
- Use: Often used to save memory in large arrays when the memory savings are important. However, it is less common than
int.
Example:
short s = 30000;3. int
- Size: 32 bits
- Range: -2,147,483,648 to 2,147,483,647
- Use: The default choice for integer values unless there is a reason to use a different type. It is widely used for counting and loop iterations.
Example:
int i = 100000;4. long
- Size: 64 bits
- Range: -9,223,372,036,854,775,808 to 9,223,372,036,854,775,807
- Use: Used when a wider range than
intis needed, especially for large-scale computations and when dealing with large numerical values.
Example:
long l = 10000000000L;
5. float
- Size: 32 bits
- Range: Approximately ±3.40282347E+38F (7 significant decimal digits)
- Use: Useful for saving memory in large arrays of floating-point numbers. However, it is less precise than
double.
Example:
float f = 3.14f;
6. double
- Size: 64 bits
- Range: Approximately ±1.79769313486231570E+308 (15 significant decimal digits)
- Use: The default choice for decimal values and more precise than
float. It is widely used for floating-point computations.
Example:
double d = 3.141592653589793;
7. char
- Size: 16 bits
- Range: 0 to 65,535 (unsigned)
- Use: Used to store single 16-bit Unicode characters. It can represent any character in the Unicode standard.
Example:
char c = 'Bhanu';
8. boolean
- Size: JVM specific (generally 1 bit, but size is not precisely defined)
- Range:
trueorfalse - Use: Used for simple flags that track true/false conditions. It’s commonly used in control statements like if-else and loops.
Example:
boolean isJavaFun = true;
Key Points
- Efficiency: Primitive types are stored directly in memory, which makes them more efficient in terms of performance compared to objects.
- Default Values: Each primitive type has a default value when declared as class-level variables (instance variables).
- Immutability: Primitive types are immutable; once a value is assigned, it cannot be changed.
Conclusion
Java’s primitive data types provide a foundation for efficient data manipulation and are integral to developing Java applications. They are straightforward and designed to be easy to use while offering sufficient flexibility for various computational tasks. For more complex data structures and behaviors, Java provides object-oriented programming capabilities with classes and interfaces.
java input and output Statements
In Java, input and output (I/O) operations are essential for interacting with users and other systems. Java provides a variety of classes and methods to handle I/O operations, ranging from simple console input and output to more complex file and network I/O. Here, we’ll explore Java’s I/O capabilities in detail, including the key classes and methods used for input and output operations.
Java Input and Output
1. Console Output with System.out
Java uses the System.out object to print output to the console. This is a built-in object of the PrintStream class, which provides methods to print data in various formats.
Methods for Output
System.out.print()
- Description: Prints text to the console without adding a newline at the end.
- Use Case: When you want to print multiple pieces of information on the same line.
Example:
System.out.print("Hello, ");
System.out.print("bhanu");
// Output: Hello, bhanu!
System.out.println()
- Description: Prints text to the console followed by a newline character. This means each call to
println()starts a new line after printing. - Use Case: Used when you want each output statement to appear on a new line.
Example:
System.out.println("Hello, World!");
System.out.println("Welcome to Java programming.");
// Output:
// Hello, World!
// Welcome to Java programming.
System.out.printf()
- Description: Prints formatted strings, similar to the
printffunction in C. It allows you to specify a format string with placeholders that are replaced by arguments. - Use Case: Useful for aligning text, formatting numbers, and inserting variables into text.
Example:
int age = 19;
String name = "Bhanu";
System.out.printf("Name: %s, Age: %d%n", name, age);
// Output: Name: Bhanu, Age: 19
Format Specifiers:
%d: Decimal integer%f: Floating-point number%s: String%c: Character%n: Platform-independent newline character
Example of Format Specifiers:
double pi = 3.14159;
System.out.printf("Value of pi: %.2f%n", pi); // Limits to 2 decimal places
// Output: Value of pi: 3.14
Customization with PrintStream
You can also customize the output stream by creating a PrintStream object and redirecting output.
Example: Redirecting output to a file
import java.io.PrintStream;
import java.io.FileOutputStream;
import java.io.IOException;

public class RedirectOutputExample {
    public static void main(String[] args) {
        try {
            PrintStream fileOut = new PrintStream(new FileOutputStream("output.txt"));
            System.setOut(fileOut);
            System.out.println("This will be written to a file instead of the console.");
        } catch (IOException e) {
            e.printStackTrace();
        }
    }
}
2. Console Input with Scanner Class
The Scanner class in Java is used to read input from various sources, including user input from the console. It provides methods to parse primitive data types and strings using regular expressions.
Creating a Scanner Object
To read input from the console, create a Scanner object and pass System.in as the input stream:
import java.util.Scanner;
Scanner scanner = new Scanner(System.in);
Common Methods of Scanner
nextLine()
- Description: Reads a line of text from the input, including any spaces. It returns the input as a
Stringup to the newline character. - Use Case: When you need to read an entire line of input as a single string, including spaces.
Example:
System.out.print("Enter your full name: ");
String fullName = scanner.nextLine();
System.out.println("Hello, " + fullName + "!");
// User Input: Bhanu
// Output: Hello, Bhanu
next()
- Description: Reads the next token (word) from the input, delimited by whitespace. It does not read spaces.
- Use Case: Useful when you want to read individual words from the input.
Example:
System.out.print("Enter your first name: ");
String firstName = scanner.next();
System.out.println("Hello, " + firstName + "!");
// User Input: Bhanu Kumar
// Output: Hello, Bhanu!
nextInt()
- Description: Reads the next token from the input as an integer.
- Use Case: When you need to read an integer value from the user.
Example:
System.out.print("Enter your age: ");
int age = scanner.nextInt();
System.out.println("You are " + age + " years old.");
// User Input: 25
// Output: You are 25 years old.
nextDouble()
- Description: Reads the next token from the input as a double-precision floating-point number.
- Use Case: When you need to read decimal numbers from the user.
Example:
System.out.print("Enter a decimal number: ");
double number = scanner.nextDouble();
System.out.println("You entered: " + number);
// User Input: 3.14
// Output: You entered: 3.14
Handling Exceptions
When reading numeric input, you might encounter InputMismatchException if the input does not match the expected data type. To handle this, you can use exception handling:
Example:
try {
    System.out.print("Enter an integer: ");
    int number = scanner.nextInt();
    System.out.println("You entered: " + number);
} catch (InputMismatchException e) {
    System.out.println("Invalid input. Please enter a valid integer.");
    scanner.next(); // Consume the invalid token to prevent an infinite loop
}
Closing the Scanner
It’s good practice to close the Scanner object when it’s no longer needed to release any underlying resources:
scanner.close();Summary
- Console Output: Use
System.out.print(),System.out.println(), andSystem.out.printf()for output operations to the console. - Console Input: Use the
Scannerclass to read input from the user, with methods likenextLine(),next(),nextInt(), andnextDouble().
Java’s console I/O capabilities make it straightforward to interact with users in command-line applications, providing essential methods for reading and printing data. For more complex I/O operations, such as file handling, Java offers additional classes and packages.
One-Dimensional and Two Dimensional Array and Example programs
Arrays in Java are used to store multiple values of the same type in a single variable. There are two primary types of arrays in Java: One-Dimensional Arrays and Two-Dimensional Arrays. Here’s a detailed explanation of each, along with example programs.
One-Dimensional Array
Definition
A one-dimensional array is a linear array where elements are stored in a single row. Each element is accessed using a single index.
Declaration and Initialization
Syntax:
dataType[] arrayName; // Declaration
arrayName = new dataType[size]; // Initialization

// Or combined declaration and initialization
dataType[] arrayName = new dataType[size];
Example:
public class OneDimensionalArrayExample {
    public static void main(String[] args) {
        // Declaration and Initialization
        int[] numbers = new int[5]; // Creates an array of size 5

        // Assigning values to array elements
        numbers[0] = 10;
        numbers[1] = 20;
        numbers[2] = 30;
        numbers[3] = 40;
        numbers[4] = 50;

        // Printing array elements
        System.out.println("One-Dimensional Array Elements:");
        for (int i = 0; i < numbers.length; i++) {
            System.out.println("Element at index " + i + ": " + numbers[i]);
        }
    }
}
–>Click here for detail Explanation of program
One-Dimensional Array Program
Program:
public class OneDimensionalArrayExample {
    public static void main(String[] args) {
        // Declaration and Initialization
        int[] numbers = new int[5]; // Creates an array of size 5

        // Assigning values to array elements
        numbers[0] = 10;
        numbers[1] = 20;
        numbers[2] = 30;
        numbers[3] = 40;
        numbers[4] = 50;

        // Printing array elements
        System.out.println("One-Dimensional Array Elements:");
        for (int i = 0; i < numbers.length; i++) {
            System.out.println("Element at index " + i + ": " + numbers[i]);
        }
    }
}
Explanation:
- Declaration and Initialization:javaCopy code
int[] numbers = new int[5];- This line declares an array named
numbersof typeintwith a size of 5. - The size of the array is fixed at 5, and it can hold 5 integer values.
- This line declares an array named
- Assigning Values:javaCopy code
numbers[0] = 10; numbers[1] = 20; numbers[2] = 30; numbers[3] = 40; numbers[4] = 50;- These lines assign values to each element of the array. The index ranges from 0 to 4 for a 5-element array.
- Printing Array Elements:javaCopy code
for (int i = 0; i < numbers.length; i++) { System.out.println("Element at index " + i + ": " + numbers[i]); }- This
forloop iterates through each index of the array from 0 to 4. numbers.lengthprovides the size of the array, which is 5 in this case.- It prints the value of each element along with its index.
- This
Output:
One-Dimensional Array Elements:
Element at index 0: 10
Element at index 1: 20
Element at index 2: 30
Element at index 3: 40
Element at index 4: 50
Two-Dimensional Array
Definition
A two-dimensional array is an array of arrays. It represents a table or matrix with rows and columns.
Declaration and Initialization
Syntax:
dataType[][] arrayName; // Declaration
arrayName = new dataType[rows][columns]; // Initialization

// Or combined declaration and initialization
dataType[][] arrayName = new dataType[rows][columns];
Example:
public class TwoDimensionalArrayExample {
    public static void main(String[] args) {
        // Declaration and Initialization
        int[][] matrix = new int[3][3]; // Creates a 3x3 matrix

        // Assigning values to array elements
        matrix[0][0] = 1;
        matrix[0][1] = 2;
        matrix[0][2] = 3;
        matrix[1][0] = 4;
        matrix[1][1] = 5;
        matrix[1][2] = 6;
        matrix[2][0] = 7;
        matrix[2][1] = 8;
        matrix[2][2] = 9;

        // Printing array elements
        System.out.println("Two-Dimensional Array Elements:");
        for (int i = 0; i < matrix.length; i++) {
            for (int j = 0; j < matrix[i].length; j++) {
                System.out.print(matrix[i][j] + " ");
            }
            System.out.println(); // New line after each row
        }
    }
}
–>Click here for detail Explanation of program
Two-Dimensional Array Program
Program:
public class TwoDimensionalArrayExample {
    public static void main(String[] args) {
        // Declaration and Initialization
        int[][] matrix = new int[3][3]; // Creates a 3x3 matrix

        // Assigning values to array elements
        matrix[0][0] = 1;
        matrix[0][1] = 2;
        matrix[0][2] = 3;
        matrix[1][0] = 4;
        matrix[1][1] = 5;
        matrix[1][2] = 6;
        matrix[2][0] = 7;
        matrix[2][1] = 8;
        matrix[2][2] = 9;

        // Printing array elements
        System.out.println("Two-Dimensional Array Elements:");
        for (int i = 0; i < matrix.length; i++) {
            for (int j = 0; j < matrix[i].length; j++) {
                System.out.print(matrix[i][j] + " ");
            }
            System.out.println(); // New line after each row
        }
    }
}
Explanation:
- Declaration and Initialization:javaCopy code
int[][] matrix = new int[3][3];- This line declares a two-dimensional array named
matrixwith 3 rows and 3 columns. - The array is initialized with default values of
0.
- This line declares a two-dimensional array named
- Assigning Values:javaCopy code
matrix[0][0] = 1; matrix[0][1] = 2; matrix[0][2] = 3; matrix[1][0] = 4; matrix[1][1] = 5; matrix[1][2] = 6; matrix[2][0] = 7; matrix[2][1] = 8; matrix[2][2] = 9;- These lines assign values to each cell of the 3×3 matrix. The first index represents the row, and the second index represents the column.
- Printing Array Elements:javaCopy code
for (int i = 0; i < matrix.length; i++) { for (int j = 0; j < matrix[i].length; j++) { System.out.print(matrix[i][j] + " "); } System.out.println(); // New line after each row }- This nested
forloop iterates through each row (i) and each column (j) of the matrix. matrix.lengthgives the number of rows, andmatrix[i].lengthgives the number of columns in a specific row.- It prints each element followed by a space. A new line is printed after each row to format the matrix.
- This nested
Output:
Two-Dimensional Array Elements:
1 2 3
4 5 6
7 8 9
Summary
One-Dimensional Array
- Structure: A single row of elements.
- Access:
arrayName[index]. - Example: Array of integers with 5 elements.
Two-Dimensional Array
- Structure: A grid (matrix) of elements with rows and columns.
- Access:
arrayName[rowIndex][columnIndex]. - Example: 3×3 matrix of integers.
These array types are foundational for data storage and manipulation in Java and provide a way to handle collections of data efficiently.
Objects and Classes
n Java, objects and classes are fundamental concepts in object-oriented programming (OOP). They are central to how Java organizes and manages data and behavior. Here’s a detailed explanation of each concept:
Classes
Definition
A class is a blueprint or template for creating objects. It defines a type of object by specifying the data (attributes) and behavior (methods) that the objects of this class will have.
Structure
A class in Java typically consists of:
- Fields: Variables that hold data specific to the class.
- Methods: Functions that define the behavior of the class.
- Constructors: Special methods used to initialize objects.
- Access Modifiers: Keywords like
public,private, andprotectedthat control the visibility of the class members.
Class Syntax
public class ClassName {
    // Fields (Attributes)
    dataType fieldName;

    // Constructor
    public ClassName(parameters) {
        // Initialize fields
    }

    // Methods
    returnType methodName(parameters) {
        // Method body
    }

    // Accessor Methods (Getters and Setters)
    public dataType getFieldName() {
        return fieldName;
    }

    public void setFieldName(dataType value) {
        this.fieldName = value;
    }
}
Example of a Class
Let’s create a simple class named Person with fields, a constructor, methods, and getters/setters.
public class Person {
    // Fields
    private String name;
    private int age;

    // Constructor
    public Person(String name, int age) {
        this.name = name;
        this.age = age;
    }

    // Method to display information
    public void displayInfo() {
        System.out.println("Name: " + name);
        System.out.println("Age: " + age);
    }

    // Getter for name
    public String getName() {
        return name;
    }

    // Setter for name
    public void setName(String name) {
        this.name = name;
    }

    // Getter for age
    public int getAge() {
        return age;
    }

    // Setter for age
    public void setAge(int age) {
        this.age = age;
    }
}
Program Explanation
- Fields (Attributes):
private String name;: Holds the name of the person.private int age;: Holds the age of the person.- The
privatekeyword restricts access to these fields to the class itself.
- Constructor:
public Person(String name, int age): A special method that initializes new objects of the class. It takesnameandageas parameters and assigns them to the fields.
- Methods:
public void displayInfo(): A method that prints the person’s name and age.- Methods can be used to define behavior for objects of the class.
- Getters and Setters:
- Getters (e.g.,
getName()) return the value of a field. - Setters (e.g.,
setName(String name)) modify the value of a field. - They are used to access and update private fields safely.
- Getters (e.g.,
Objects
Definition
An object is an instance of a class. It is a concrete realization of the class blueprint and represents a specific entity with its own set of data and behaviors.
Creating Objects
To create an object in Java, you use the new keyword followed by the class constructor.
Object Syntax
ClassName objectName = new ClassName(arguments);Example Program
Here’s how you can create and use objects of the Person class:
public class Main {
    public static void main(String[] args) {
        // Creating objects of the Person class
        Person person1 = new Person("bhanu", 30);
        Person person2 = new Person("prakash", 25);

        // Using methods of Person class
        person1.displayInfo();
        person2.displayInfo();

        // Accessing and modifying fields using getters and setters
        System.out.println("Person1's name: " + person1.getName());
        person1.setAge(31); // Update age
        System.out.println("Updated age of Person1: " + person1.getAge());
    }
}
Explanation
- Creating Objects:
Person person1 = new Person("bhanu", 30);: Creates aPersonobject namedperson1with the name"bhanu"and age30.Person person2 = new Person("prakash", 25);: Creates anotherPersonobject namedperson2with the name"prakash"and age25.
- Using Methods:
person1.displayInfo();: Calls thedisplayInfo()method onperson1to print the details.person2.displayInfo();: Calls thedisplayInfo()method onperson2to print the details.
- Accessing and Modifying Fields:
person1.getName();: Retrieves the name ofperson1.person1.setAge(31);: Updates the age ofperson1to31.person1.getAge();: Retrieves the updated age ofperson1.
Use of New operator
The new operator in Java is used to create new instances of objects. It is essential for allocating memory for objects and invoking constructors to initialize them. Here’s a detailed explanation of how the new operator is used:
Basic Syntax
ClassName objectName = new ClassName(arguments);
Explanation
- ClassName: The name of the class from which you want to create an object.
- objectName: The name you want to give to the newly created object.
- new: The keyword that allocates memory for the object.
- ClassName(arguments): The constructor of the class being called to initialize the object.
Usage of Methods
Methods in Java are blocks of code designed to perform specific tasks. They help in organizing and managing code efficiently, promoting reusability, and improving readability. Here’s a detailed overview of how to use methods in Java:
Basic Syntax of a Method
Method Definition
returnType methodName(parameters) {
    // Method body
    // Optional: return value;
}
Explanation
- returnType: The type of value the method returns. If the method does not return a value, use
void. - methodName: The name of the method.
- parameters: A comma-separated list of input values (parameters) that the method takes. You can omit parameters if the method doesn’t need any.
- Method Body: The code that defines what the method does.
Example
public class Calculator {
    // Method to add two integers
    public int add(int a, int b) {
        return a + b;
    }

    // Method to subtract two integers
    public int subtract(int a, int b) {
        return a - b;
    }

    // Method to print a message
    public void printMessage(String message) {
        System.out.println(message);
    }
}
Calling Methods
To use a method, you need to call it from another method or class. Here’s how to call methods:
Example Program
public class Main {
    public static void main(String[] args) {
        // Create an object of the Calculator class
        Calculator calc = new Calculator();

        // Call methods of Calculator class
        int sum = calc.add(10, 5);
        int difference = calc.subtract(10, 5);

        // Print results
        System.out.println("Sum: " + sum);
        System.out.println("Difference: " + difference);

        // Call method to print a message
        calc.printMessage("Hello, this is a message.");
    }
}
Explanation
- Creating an Object:javaCopy code
Calculator calc = new Calculator();- Creates an instance of the
Calculatorclass.
- Creates an instance of the
- Calling Methods:
int sum = calc.add(10, 5);: Calls theaddmethod of theCalculatorclass with arguments10and5, and stores the result insum.int difference = calc.subtract(10, 5);: Calls thesubtractmethod with arguments10and5, and stores the result indifference.calc.printMessage("Hello, this is a message.");: Calls theprintMessagemethod with the argument"Hello, this is a message.".
- Using Results:
System.out.println("Sum: " + sum);: Prints the result of the addition.System.out.println("Difference: " + difference);: Prints the result of the subtraction.
Summary
- Methods: Blocks of code that perform specific tasks, defined with a return type, name, parameters, and body.
- Usage: Methods are called using objects (for instance methods) or directly by the class name (for static methods) to execute code and optionally return values.
- Types: Include instance methods, static methods, void methods, and returning methods.
Methods help modularize code, making it easier to manage and reuse.
Usage of Constructors with Example Programs
In Java, constructors are special methods used to initialize objects. They are called when an instance of a class is created and are used to set the initial state of an object. Here’s a detailed overview of constructors, including their definition and usage.
Definition of Constructors
Basic Syntax
public class ClassName {
    // Constructor
    public ClassName(parameters) {
        // Initialization code
    }
}
Explanation
- ClassName: The constructor’s name must be the same as the class name.
- parameters: A comma-separated list of parameters used to initialize the object. Constructors can have zero or more parameters.
- Constructor Body: Contains code to initialize the fields of the object.
Rules of Creating Java Constructor
- Name: Must match the class name.
- Return Type: Constructors do not have a return type.
- Access Modifiers: Can be
public,protected, orprivate. - Overloading: Multiple constructors with different parameters are allowed.
- Chaining: Can call other constructors in the same class using
this(). - No Inheritance: Constructors are not inherited.
- Initialization: Used to initialize object fields.
- Order: Superclass constructors are called before subclass constructors.
Types of Constructor
1. Default Constructor
Definition: A default constructor is automatically provided by Java if no other constructors are defined in the class. It has no parameters and initializes object fields to default values.
Characteristics:
- No parameters.
- Automatically initializes fields to default values (
nullfor objects,0for integers, etc.).
Example:
javaCopy codepublic class Person {
    private String name;
    private int age;

    // Default constructor
    public Person() {
        name = "Unknown";
        age = 0;
    }

    public void displayInfo() {
        System.out.println("Name: " + name);
        System.out.println("Age: " + age);
    }
}

public class Main {
    public static void main(String[] args) {
        // Creating an object using the default constructor
        Person person1 = new Person();
        person1.displayInfo();
    }
}
Explanation:
Person()initializesnameto"Unknown"andageto0.- When
new Person()is called, the default constructor is used to create the object.
2. Parameterized Constructor
Definition: A parameterized constructor allows initializing an object with specific values provided as arguments.
Characteristics:
- Takes parameters to initialize fields.
- Allows customization of object creation.
Example:
javaCopy codepublic class Person {
    private String name;
    private int age;

    // Parameterized constructor
    public Person(String name, int age) {
        this.name = name;
        this.age = age;
    }

    public void displayInfo() {
        System.out.println("Name: " + name);
        System.out.println("Age: " + age);
    }
}

public class Main {
    public static void main(String[] args) {
        // Creating objects using the parameterized constructor
        Person person1 = new Person("Bhanu", 30);
        Person person2 = new Person("Anita", 25);

        person1.displayInfo();
        person2.displayInfo();
    }
}
Explanation:
Person(String name, int age)initializesnameandagewith the values provided.new Person("Bhanu", 30)creates an object withname"Bhanu"andage30.
3. Constructor Overloading
Definition: Constructor overloading allows a class to have multiple constructors with different parameter lists.
Characteristics:
- Multiple constructors with different parameters.
- Provides flexibility in object creation.
Example:
javaCopy codepublic class Person {
    private String name;
    private int age;
    private String address;

    // Constructor with two parameters
    public Person(String name, int age) {
        this.name = name;
        this.age = age;
        this.address = "Not provided";
    }

    // Constructor with three parameters
    public Person(String name, int age, String address) {
        this.name = name;
        this.age = age;
        this.address = address;
    }

    public void displayInfo() {
        System.out.println("Name: " + name);
        System.out.println("Age: " + age);
        System.out.println("Address: " + address);
    }
}

public class Main {
    public static void main(String[] args) {
        // Creating objects using different constructors
        Person person1 = new Person("Bhanu", 30);
        Person person2 = new Person("Anita", 25, "123 Main St");

        person1.displayInfo();
        person2.displayInfo();
    }
}
Explanation:
- Two constructors: one with two parameters and another with three parameters.
new Person("Bhanu", 30)uses the constructor with two parameters.new Person("Anita", 25, "123 Main St")uses the constructor with three parameters.
4. Constructor Chaining
Definition: Constructor chaining refers to a constructor calling another constructor in the same class using this().
Characteristics:
- Helps avoid code duplication.
- A constructor can call another constructor in the same class.
Example:
javaCopy codepublic class Person {
    private String name;
    private int age;

    // Constructor with no parameters
    public Person() {
        this("Unknown", 0); // Calls the parameterized constructor
    }

    // Constructor with parameters
    public Person(String name, int age) {
        this.name = name;
        this.age = age;
    }

    public void displayInfo() {
        System.out.println("Name: " + name);
        System.out.println("Age: " + age);
    }
}

public class Main {
    public static void main(String[] args) {
        // Creating objects
        Person person1 = new Person(); // Calls the no-argument constructor
        Person person2 = new Person("Bhanu", 30); // Calls the parameterized constructor

        person1.displayInfo();
        person2.displayInfo();
    }
}
Explanation:
Person()callsthis("Unknown", 0)to initialize with default values.Person(String name, int age)initializes with provided values.
Summary
- Default Constructor: No parameters, initializes fields to default values.
- Parameterized Constructor: Takes parameters, initializes fields with specific values.
- Constructor Overloading: Multiple constructors with different parameter lists.
- Constructor Chaining: A constructor calls another constructor in the same class using
this().
Constructors are essential for setting up initial states of objects and ensuring that they are properly initialized according to the provided values or default settings.
difference between Constructor and Method
| Aspect | Constructor | Method |
|---|---|---|
| Purpose | Initializes an object when it is created. | Defines the behavior of an object. |
| Syntax | public ClassName(parameters) { /* body */ } | returnType methodName(parameters) { /* body */ } |
| Name | Must match the class name. | Can have any valid name. |
| Return Type | No return type (not even void). | Must specify a return type or void. |
| Called | Automatically called when an object is created. | Explicitly called by the object after creation. |
| Usage | Used to set initial values for object attributes. | Used to perform actions or computations. |
| Inheritance | Constructors are not inherited. | Methods can be inherited and overridden. |
| Overloading | Can be overloaded (multiple constructors with different parameters). | Can be overloaded (multiple methods with different parameters). |
| Chaining | Can chain to other constructors within the same class using this(). | Can call other methods within the same class. |
| Access Modifiers | Can use access modifiers (e.g., public, private). | Can use access modifiers (e.g., public, private). |
| Initialization | Automatically initializes the object’s state. | Initializes or modifies the object’s state based on method logic. |
Method Overloading and Constructure overloading
Method Overloading
Definition: Method overloading in Java allows a class to have more than one method with the same name but different parameters. This provides flexibility in how methods can be called and utilized.
Key Points:
- Same Method Name: Overloaded methods must have the same name.
- Different Parameters: They must have different parameter lists (i.e., different types or numbers of parameters).
- Return Type: Method overloading is not distinguished by return type alone. The return type can be the same or different, but it alone is not sufficient to overload a method.
Example:
public class Calculator {

    // Method with two int parameters
    public int add(int a, int b) {
        return a + b;
    }

    // Overloaded method with three int parameters
    public int add(int a, int b, int c) {
        return a + b + c;
    }

    // Overloaded method with two double parameters
    public double add(double a, double b) {
        return a + b;
    }
}

public class Main {
    public static void main(String[] args) {
        Calculator calc = new Calculator();

        // Calling different overloaded methods
        System.out.println("Sum of 2 and 3: " + calc.add(2, 3));         // Calls add(int a, int b)
        System.out.println("Sum of 1, 2, and 3: " + calc.add(1, 2, 3));  // Calls add(int a, int b, int c)
        System.out.println("Sum of 2.5 and 3.5: " + calc.add(2.5, 3.5)); // Calls add(double a, double b)
    }
}
Explanation:
add(int a, int b): Adds two integers.add(int a, int b, int c): Adds three integers. This method is overloaded by adding an additional parameter.add(double a, double b): Adds two doubles. This method is overloaded by changing the parameter types.
Ways to Overload Methods
Method overloading in Java allows you to create multiple methods with the same name but different parameter lists. This flexibility enables you to define several variations of a method to handle different types or numbers of arguments.
1. Different Number of Parameters
Code Example:
public class Printer {

    // Method with one parameter
    public void print(String message) {
        System.out.println("Message: " + message);
    }

    // Overloaded method with two parameters
    public void print(String message, int times) {
        for (int i = 0; i < times; i++) {
            System.out.println("Message: " + message);
        }
    }
}

public class Main {
    public static void main(String[] args) {
        Printer printer = new Printer();
        printer.print("Hello!");           // Calls method with one parameter
        printer.print("Hello!", 3);        // Calls method with two parameters
    }
}
Explanation:
print(String message): This method takes a singleStringparameter. It prints the message once.print(String message, int times): This method takes aStringand anint. It prints the message the number of times specified by theintparameter.printer.print("Hello!"): Calls the method that prints the message once.printer.print("Hello!", 3): Calls the method that prints the message three times.
2. Different Types of Parameters
Code Example:
public class Calculator {

    // Method with int parameters
    public int add(int a, int b) {
        return a + b;
    }

    // Overloaded method with double parameters
    public double add(double a, double b) {
        return a + b;
    }
}

public class Main {
    public static void main(String[] args) {
        Calculator calc = new Calculator();
        System.out.println("Sum (int): " + calc.add(5, 10));           // Calls method with int parameters
        System.out.println("Sum (double): " + calc.add(5.5, 10.5));    // Calls method with double parameters
    }
}
Explanation:
add(int a, int b): This method adds two integers.add(double a, double b): This method adds two doubles.calc.add(5, 10): Calls the method that handles integers.calc.add(5.5, 10.5): Calls the method that handles doubles.
Constructor Overloading
Definition: Constructor overloading means creating multiple constructors with the same name (which is the class name) but with different parameter lists. It enables different ways to initialize an object based on the parameters provided.
Key Points
- Same Name: All overloaded constructors must have the same name as the class.
- Different Parameters: They must differ in the number or type of parameters.
- No Return Type: Constructors do not have a return type, not even
void. - Initialization: Overloaded constructors provide different ways to initialize objects with various initial values.
Example with Detailed Explanation
Consider a Person class with overloaded constructors:
public class Person {
    private String name;
    private int age;
    private String address;

    // Default constructor
    public Person() {
        this.name = "Unknown";
        this.age = 0;
        this.address = "Not provided";
    }

    // Constructor with one parameter
    public Person(String name) {
        this.name = name;
        this.age = 0;
        this.address = "Not provided";
    }

    // Constructor with two parameters
    public Person(String name, int age) {
        this.name = name;
        this.age = age;
        this.address = "Not provided";
    }

    // Constructor with three parameters
    public Person(String name, int age, String address) {
        this.name = name;
        this.age = age;
        this.address = address;
    }

    public void displayInfo() {
        System.out.println("Name: " + name);
        System.out.println("Age: " + age);
        System.out.println("Address: " + address);
    }
}

public class Main {
    public static void main(String[] args) {
        // Creating objects using different constructors
        Person person1 = new Person();                              // Calls default constructor
        Person person2 = new Person("Bhanu");                       // Calls constructor with one parameter
        Person person3 = new Person("Anita", 25);                   // Calls constructor with two parameters
        Person person4 = new Person("Raj", 30, "123 Main St");      // Calls constructor with three parameters

        person1.displayInfo();
        person2.displayInfo();
        person3.displayInfo();
        person4.displayInfo();
    }
}
–>Click here for Detail Explanation for this program
Default Constructor
public Person() {
    this.name = "Unknown";
    this.age = 0;
    this.address = "Not provided";
}
- Purpose: Initializes the object with default values.
- Usage:
Person person1 = new Person();creates an object withnameas"Unknown",ageas0, andaddressas"Not provided".
Constructor with One Parameter
public Person(String name) {
    this.name = name;
    this.age = 0;
    this.address = "Not provided";
}
- Purpose: Initializes the object with a specific
nameand default values forageandaddress. - Usage:
Person person2 = new Person("Bhanu");creates an object withnameas"Bhanu",ageas0, andaddressas"Not provided".
Constructor with Two Parameters
public Person(String name, int age) {
    this.name = name;
    this.age = age;
    this.address = "Not provided";
}
- Purpose: Initializes the object with specific
nameandage, and a default value foraddress. - Usage:
Person person3 = new Person("Anita", 25);creates an object withnameas"Anita",ageas25, andaddressas"Not provided".
Constructor with Three Parameters
public Person(String name, int age, String address) {
    this.name = name;
    this.age = age;
    this.address = address;
}
Usage: Person person4 = new Person("Raj", 30, "123 Main St"); creates an object with name as "Raj", age as 30, and address as "123 Main St"
Purpose: Initializes the object with specific values for name, age, and address.
Summary
Constructor overloading provides multiple ways to initialize objects in Java. By defining multiple constructors with different parameter lists, you can create objects with different initial states based on the available data. This flexibility is useful for handling different scenarios in object creation and initialization.
Usage of “This” pointer
In Java, the this keyword is used as a reference to the current object instance within a class. It serves several purposes, especially in methods and constructors. Here’s a detailed explanation of its usage:
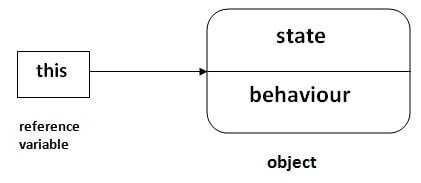
Usage of this Keyword
- Distinguishing Instance Variables from Local VariablesWhen instance variables and method parameters or local variables have the same name,
thishelps to differentiate between them. - this can be used to refer current class instance variable.
- this can be used to invoke current class method (implicitly)
- this() can be used to invoke current class constructor.
- this can be passed as an argument in the method call.
- this can be passed as argument in the constructor call.
- this can be used to return the current class instance from the method.
Example:
public class Employee {
    private String name;
    private int age;

    // Constructor
    public Employee(String name, int age) {
        this.name = name;  // this.name refers to the instance variable
        this.age = age;    // this.age refers to the instance variable
    }

    public void displayInfo() {
        System.out.println("Name: " + this.name); // this.name refers to the instance variable
        System.out.println("Age: " + this.age);   // this.age refers to the instance variable
    }
}

public class Main {
    public static void main(String[] args) {
        Employee emp = new Employee("John", 30);
        emp.displayInfo();
    }
}Explanation:
this.name = name:this.namerefers to the instance variablename, whilenamerefers to the parameter passed to the constructor.this.age = age: Similarly,this.agerefers to the instance variableage, andageis the parameter.
Definition of Static
In Java, the static keyword is used to define class-level methods and variables. This means that the members marked with static belong to the class itself rather than to any specific instance of the class. Here’s a detailed breakdown of the static keyword:
Definition and Usage of static
- Static Variables (Class Variables)
- Definition: Static variables are shared among all instances of a class. They are initialized only once and their values are common to all objects of the class.
- Usage: They are typically used for constants or any data that should be shared across all instances of a class.
Example:
public class Counter {
    public static int count = 0; // Static variable

    public Counter() {
        count++; // Increment count for every new instance
    }

    public static void displayCount() {
        System.out.println("Count: " + count); // Access static variable
    }
}

public class Main {
    public static void main(String[] args) {
        new Counter();
        new Counter();
        Counter.displayCount(); // Displays "Count: 2"
    }
}

Explanation:
public static int count: This static variable count is shared among all instances of the Counter class. Every time a new Counter object is created, count is incremented.
Counter.displayCount(): Static methods can access static variables without creating an instance of the class.
Static Methods
- Definition: Static methods belong to the class rather than to any specific instance. They can be called without creating an instance of the class.
- Usage: They are commonly used for utility or helper methods that don’t depend on instance-specific data.
Example:
public class MathUtils {
    public static int add(int a, int b) {
        return a + b; // Static method
    }

    public static int multiply(int a, int b) {
        return a * b; // Static method
    }
}

public class Main {
    public static void main(String[] args) {
        int sum = MathUtils.add(5, 3);       // Call static method
        int product = MathUtils.multiply(4, 2); // Call static method
        System.out.println("Sum: " + sum);
        System.out.println("Product: " + product);
    }
}
Explanation:
public static int add(int a, int b): This static method can be called directly using the class name (MathUtils.add), without needing an instance ofMathUtils.
Static Blocks
- Definition: Static blocks are used for static initializations. They are executed once when the class is first loaded into memory.
- Usage: They are used for initializing static variables or performing class-level setup.
Example:
public class Initialization {
    public static int value;

    static {
        value = 10; // Static block to initialize static variable
        System.out.println("Static block executed");
    }

    public static void displayValue() {
        System.out.println("Value: " + value);
    }
}

public class Main {
    public static void main(String[] args) {
        Initialization.displayValue(); // "Static block executed" followed by "Value: 10"
    }
}
Explanation:
static { ... }: The static block initializes the static variablevalueand prints a message. This block runs when the class is loaded, even before any objects are created.
Static Classes
- Definition: In Java, only nested classes can be declared as
static. A static nested class does not have access to the instance variables and methods of its enclosing class. - Usage: Useful for creating utility or helper classes that logically belong to the outer class.
Example:
public class OuterClass {
    private static String outerStatic = "Outer Static";

    static class NestedStaticClass {
        public void display() {
            System.out.println("Accessing from static nested class: " + outerStatic);
        }
    }

    public static void main(String[] args) {
        OuterClass.NestedStaticClass nested = new OuterClass.NestedStaticClass();
        nested.display(); // Access static variable of outer class
    }
}- Explanation:
static class NestedStaticClass: This nested class is static and can access static members of the outer class but not instance members.
Summary
- Static Variables: Shared among all instances of a class; initialized once.
- Static Methods: Belong to the class rather than any instance; can be called without creating an object.
- Static Blocks: Used for static initialization and executed when the class is loaded.
- Static Nested Classes: Can be used to create utility classes that do not require access to instance members of the outer class.
The static keyword provides a way to manage class-level data and methods efficiently, ensuring that certain variables and methods are shared across all instances of the class and can be accessed without creating an instance.
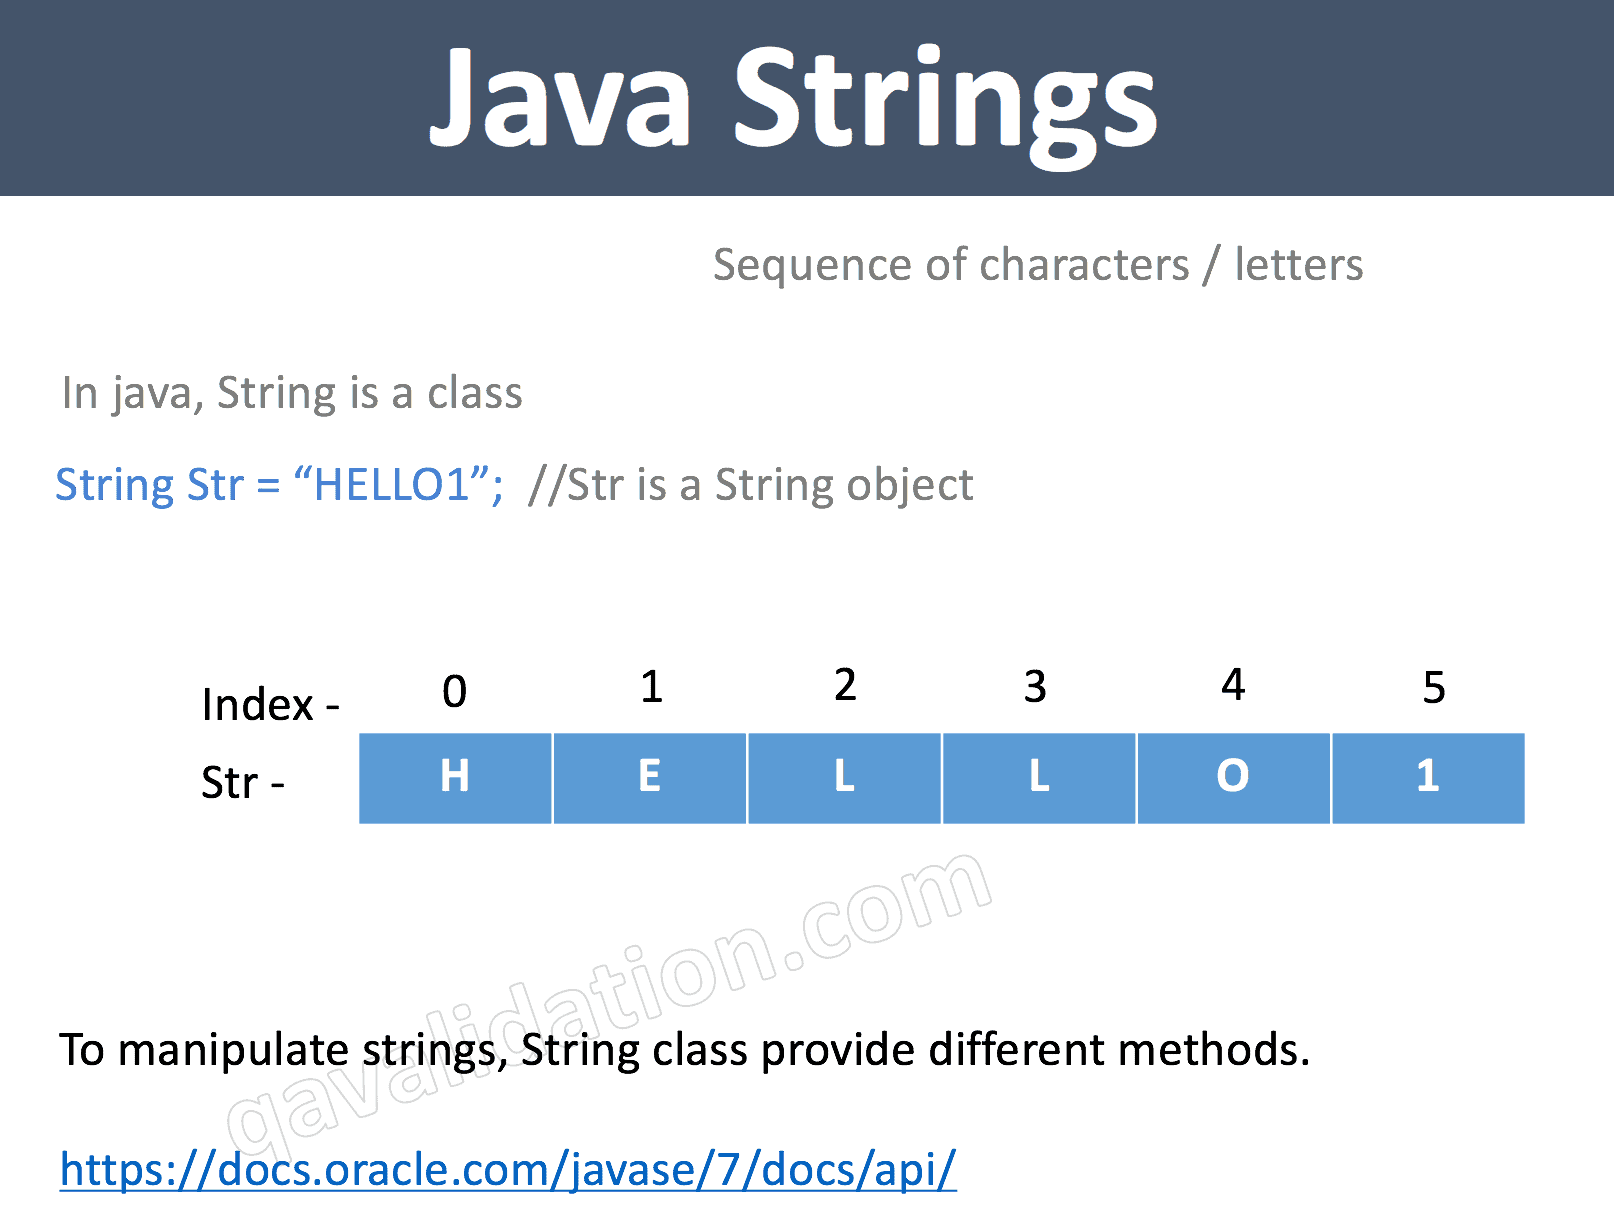
STRINGS
In the given example only one object will be created. Firstly JVM will not find any string object with the value “Welcome” in the string constant pool, so it will create a new object. After that it will find the string with the value “Welcome” in the pool, it will not create a new object but will return the reference to the same instance. In this article, we will learn about Java Strings.
What are Strings in Java?
Strings are the type of objects that can store the character of values and in Java, every character is stored in 16 bits i,e using UTF 16-bit encoding. A string acts the same as an array of characters in Java.
Example:
String name = "bhanu";
Summary
- Immutable Strings: Once created, their content cannot be changed.
- String Operations: Concatenation, comparison, substring extraction, trimming, and searching are common operations.
- StringBuilder and StringBuffer: Used for mutable strings;
StringBuilderis generally preferred due to better performance. - Interning: Reuses strings from a common pool to optimize memory usage.
Strings in Java are versatile and crucial for text manipulation, with a range of methods and classes designed to handle various operations efficiently.
Java string class methods
Commonly Used Methods of the String Class
charAt(int index)- Description: Returns the character at the specified index.
- Example:
String name = "Bhanu";char initial = name.charAt(0); // 'B'
length()- Description: Returns the length of the string.
- Example:
String name = "Bhanu";int length = name.length(); // 5
isEmpty()- Description: Returns
trueif the string is empty (length() == 0), otherwisefalse. - Example:
String name = "";boolean isEmpty = name.isEmpty(); // true
- Description: Returns
toLowerCase()- Description: Returns a new string with all characters converted to lower case.
- Example:
String name = "Bhanu";String lowerName = name.toLowerCase(); // "bhanu"
toUpperCase()- Description: Returns a new string with all characters converted to upper case.
- Example:
String name = "Bhanu";String upperName = name.toUpperCase(); // "BHANU"
trim()- Description: Returns a new string with leading and trailing whitespace removed.
- Example:
String name = " Bhanu ";String trimmedName = name.trim(); // "Bhanu"
substring(int beginIndex)- Description: Returns a new string that is a substring starting from the specified index to the end of the string.
- Example:
String name = "Bhanu prakash"; String subName = name.substring(7); // "prakash"
substring(int beginIndex, int endIndex)- Description: Returns a new string that is a substring from
beginIndex(inclusive) toendIndex(exclusive). - Example:
String name = "Bhanu prakash"; String subName = name.substring(0, 5); // "Bhanu"
- Description: Returns a new string that is a substring from
indexOf(String str)- Description: Returns the index of the first occurrence of the specified substring. Returns
-1if the substring is not found. - Example:
String name = "Bhanu prakash"; int index = name.indexOf("prakash"); //7
- Description: Returns the index of the first occurrence of the specified substring. Returns
lastIndexOf(String str)- Description: Returns the index of the last occurrence of the specified substring. Returns
-1if the substring is not found. - Example:
String name = "Bhanu Kumar Kumar"; int index = name.lastIndexOf("Kumar"); // 12
- Description: Returns the index of the last occurrence of the specified substring. Returns
contains(CharSequence sequence)- Description: Returns
trueif the string contains the specified sequence of characters. - Example:
String name = "Bhanu prakash";boolean contains = name.contains("prakash"); // true
- Description: Returns
replace(CharSequence target, CharSequence replacement)- Description: Returns a new string where all occurrences of the specified
targetsequence are replaced with thereplacementsequence. - Example:
String name = "Bhanu Kumar";String replacedName = name.replace("Kumar", "prakash"); // "Bhanu prakash"
- Description: Returns a new string where all occurrences of the specified
replaceAll(String regex, String replacement)- Description: Replaces each substring that matches the given regular expression with the given replacement string.
- Example:
String name = "Bhanu 123";String replacedName = name.replaceAll("\\d+", ""); // "Bhanu "
split(String regex)- Description: Splits the string into an array of substrings based on the specified regular expression.
- Example:
String name = "Bhanu,prakash";String[] parts = name.split(","); // ["Bhanu", "prakash"]
startsWith(String prefix)- Description: Returns
trueif the string starts with the specified prefix. - Example:
String name = "Bhanu prakash";boolean startsWith = name.startsWith("Bhanu"); // true
- Description: Returns
endsWith(String suffix)- Description: Returns
trueif the string ends with the specified suffix. - Example:
String name = "Bhanu prakash";boolean endsWith = name.endsWith("prakash"); // true
- Description: Returns
Summary
The String class in Java provides a range of methods for creating, manipulating, and querying strings. Whether you need to convert cases, trim whitespace, search for substrings, or split strings, these methods offer powerful tools for handling text efficiently.
Final keyword
In Java, the final keyword is used to define constants, prevent method overriding, and inheritance. Here’s a detailed explanation of its various uses:
Uses of final Keyword
- Final Variables
- Definition: A variable declared with the
finalkeyword cannot be changed once it has been initialized. This means that its value remains constant throughout its lifetime. - Usage: Used for defining constants or immutable variables.
- Syntax:
final int MAX_VALUE = 100;
- Definition: A variable declared with the
- Final Variables:
- Once assigned, their value cannot be changed.
- Must be initialized at the time of declaration or in the constructor.
- For reference types, you can’t reassign the reference, but you can modify the object it points to.
- Final Methods:
- Cannot be overridden by subclasses.
- Useful for ensuring that the method’s behavior remains consistent across all subclasses.
- Final Classes:
- Cannot be extended.
- Useful for classes that should not be altered or extended, like utility classes.
Benefits:
- Initialization: Ensures variables are set up correctly before use.
- Performance: Potentially allows for optimizations by the compiler.
- Security: Prevents alteration of critical code aspects, enhancing security.
Final Methods:
- Definition: A method declared with the
finalkeyword cannot be overridden by subclasses. This means the method’s implementation remains unchanged in any subclass. - Usage: Used to ensure that a method’s behavior remains consistent and cannot be altered by subclasses.
- Syntax:
public class Parent{public final void display(){System.out.println("This is a final method.");} }
Example:
public class Parent {
    public final void display() {
        System.out.println("This is a final method.");
    }
}

public class Child extends Parent {
    // Compilation error: Cannot override the final method from Parent
    // public void display() {
    //     System.out.println("Attempting to override.");
    // }
}
Final Classes
- Definition: A class declared with the
finalkeyword cannot be subclassed. This means no other class can extend a final class. - Usage: Used to prevent inheritance, ensuring that the class’s implementation remains unchanged and cannot be extended.
- Syntax:
public final class FinalClass{// Class code}